
LUT library


"LUT library" in LmBox browses the color filters in your local folders and extension packs on the desktop. The list shows a preview of the look, you can enlarge it to compare, and then apply it to a Premiere Pro or DaVinci Resolve timeline. The page title in the app is "LUTs", and the sidebar icon is . Members also get a 2000+ professional LUT pack, which you can mount here to manage and apply.
Video tutorial
Public class demo: Media management · getting started with LUT library (preview, apply, clear; Premiere Pro / DaVinci Resolve). Open on Bilibili
The early extension demo is still a useful reference: Open on Bilibili
What you will learn
- The member LUT pack: how the 2000+ professional color presets are mounted on this page
- Add folders: with the button, or drag them into the sidebar from Finder / File Explorer
- The top toolbar: search, favorites, labels, and apply mode / Look / compare / clear / capture
- Apply modes: Premiere Pro on the clip or on an adjustment layer; DaVinci Resolve on the source clip or on a grading node
- Enlarge the preview to compare before and after, and capture a still inside the pop-up
- Right-click: rating, color label, open folder, preview, delete
Guide
This is the main Lab guide for the LmBox desktop app. Screenshots on this page show the Chinese interface. You can switch the app to English in Settings.
What it does
| Feature | Description |
|---|---|
| Folders / extension packs | The sidebar manages local LUT folders and extension packs. Add them with the button or drag a folder in |
| Member LUT pack | Members get 2000+ professional color LUTs. Mount them to preview and apply |
| Look preview | List thumbnails show the look after the LUT is applied |
| Enlarged preview | Double-click a thumbnail or right-click Preview to compare the original and the graded picture side by side |
| Top toolbar | Key part: search and filters + apply mode / Look / compare / clear / capture (see below) |
| Right-click management | Rating, color label, open containing folder, delete file |
Before you start
- Install and open the LmBox desktop app
- In the sidebar pick or , and the extension icon should be lit (needed when you import to the timeline)
- Premiere Pro: open a sequence and select a video clip on the timeline
- DaVinci Resolve: park the playhead on the target clip
Member bonus: 2000+ professional LUT pack
With the right membership benefit on your account, you can get a pack of 2000+ professional color preset LUTs (Professional LUT Color Correction Filter Presets). They cover common looks for many camera brands. Once mounted on this page, you can preview, search and apply them in Premiere Pro or DaVinci Resolve.

Figure: cover of the member LUT pack. The image shows Chinese text.
How to use it:
- Sign in and make sure your account has the membership / extension pack benefit
- Download or deploy the pack to your computer as described in your benefit
- Open , use Add folder or extension pack, or drag the unzipped folder into the sidebar
- Preview in the list, then double-click to import to the timeline using the apply mode in the top bar
You can also add your own folders of local .cube files without a membership. The member pack is a benefit; the exact tier and how to get it depend on your account.
The desktop screen
Open from the sidebar. On the left is the local folder tree and on the right the LUT list of the current folder.
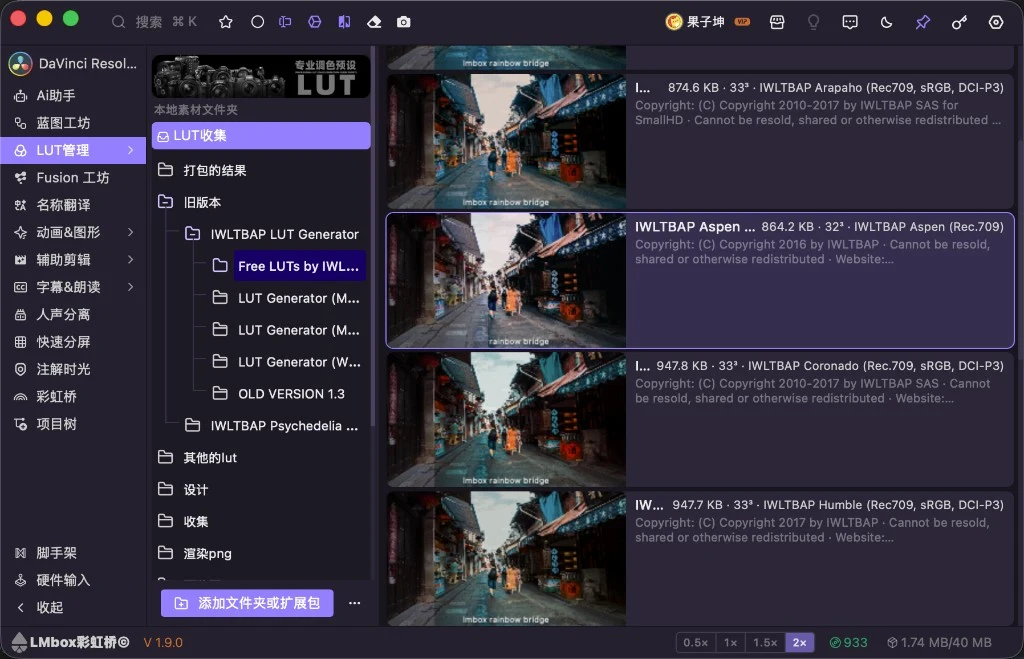
Figure: LUT library with local folders, list previews and "Add folder or extension pack". The screenshot shows the Chinese interface.
Screen areas
| Area | What it does |
|---|---|
| sidebar | Opens this page |
| Local media folders | Browse the folder tree you added. Click a folder to refresh the list on the right |
| + Add folder or extension pack | Pick a local LUT folder or an extension pack; you can also drag it in (see next section) |
| List items | Thumbnail + name, size, cube precision, color space and so on |
| 0.5x / 1x / 1.5x / 2x at the bottom | Changes the size of the list previews |
| Top toolbar | See "Top toolbar" (read it before importing) |
Add folders (drag or button)
The "Local media folders" sidebar has two ways to add:
- Click + Add folder or extension pack at the bottom and pick a folder or pack in the dialog
- Drag: drag a folder with
.cubefiles (several at once is fine) from Finder / File Explorer onto the sidebar. When the dashed hint Drop here to add shows, let go
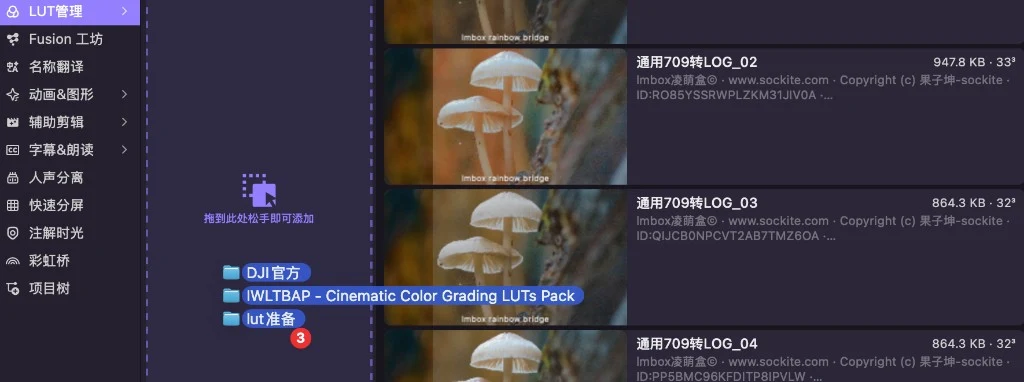
Figure: drag several LUT folders onto the dashed area in the sidebar and let go to add them to the local media folders. The screenshot shows the Chinese interface.
After you add one, its root appears on the left. Open it to browse the previews on the right. Extension packs can be mounted from the same entry (follow the options on screen).
Top toolbar (key part)
After you open , the row at the top of the window has the common media-lab area plus the LUT-specific switches. Before importing to the timeline, choose the apply mode and the compare / capture options here.

Figure: the top bar from left to right: search, favorites, color labels, then apply mode, Look, compare, clear, capture. The screenshot shows the Chinese interface.
Common: search and filters
| Control | What it does |
|---|---|
| (shortcut ⌘ K / Ctrl+K) | Search the current LUT library by name and other keywords |
| Show only favorite (starred) LUTs; you can filter further by stars | |
| Filter the list by color label (same as the colored dots in the right-click menu) |
LUT-specific: apply and preview (highlighted area)
From left to right these are the apply and preview switches. Click to toggle (hover to see what the current state means; DaVinci Resolve does not show the Look switch):
| Icon | Premiere Pro | DaVinci Resolve | Notes |
|---|---|---|---|
| / | On the clip ↔ Adjustment layer | Source clip (Input LUT) ↔ Grading node | Where it applies. Choose before importing; see the next section |
| / | Input LUT ↔ Look appearance | Not shown (Premiere Pro only) | Premiere Pro writes the Input LUT or the Look in Lumetri |
| Whether the list / enlarged preview shows a before / after compare | Same | On: thumbnails and the enlarged window compare the original with the graded picture. Off: only the graded picture | |
| Clears the Look or Input LUT on the selected clip (follows the switch before it) | Clears the Input LUT on the playhead clip or the node LUT | Clears the matching grade for the current "Look / Input" mode | |
| Updates the folder's compare original with the timeline picture | Same | Click to capture; hold Shift and click to remove a custom preview image. Select a writable folder in the sidebar first |
Suggested order: pick the extension and clip → choose where it applies in the top bar (and the Look in Premiere Pro) → turn on Compare if needed → double-click a list item to import → use Clear if it is wrong; use Capture if the preview image is stale.
Apply modes (must read)
Choose the apply mode in the top bar before importing. The wording differs between Premiere Pro and DaVinci Resolve. Here is what each one means:
Premiere Pro
| Top bar option | What it does |
|---|---|
| Apply on selected clip (on the clip) | The LUT goes straight onto the video clip currently selected on the timeline |
| Apply on adjustment layer | Creates (or uses) an adjustment layer and puts the LUT on it. The layer length matches the selected clip |
Premiere Pro can also switch between Apply Input LUT and Apply Look appearance (Look is Premiere Pro only).
DaVinci Resolve
| Top bar option | What it does |
|---|---|
| Source clip Input LUT (source clip) | Sets the source Input LUT of the clip at the playhead (done on the Edit page, not in a grading node) |
| Grading node LUT | Puts the LUT on a grading node of the current clip on the Color page |
DaVinci Resolve does not show the Look switch. Clearing treats "Input LUT" and "node" separately, so do not mix them.
Steps
- Add folders: click Add folder or extension pack, or drag folders onto the sidebar at the dashed hint and let go (several at once is fine)
- Open the target folder on the left and browse previews on the right
- Use the scale at the bottom to enlarge thumbnails if you need
- In the top toolbar, choose where it applies (and the Look in Premiere Pro); turn on Compare if you want a before / after preview
- Make sure the target clip is selected on the timeline (DaVinci Resolve: playhead on it), then double-click a list item to import
- If the preview is stale, select a writable folder in the sidebar and click Capture in the top bar. If you applied it by mistake, use Clear
Enlarged preview
Double-click a list thumbnail, or right-click and choose Preview, to open the enlarged compare window: the original on the left and the graded picture on the right. In the pop-up, the camera icon captures a still from the timeline and updates the compare original.
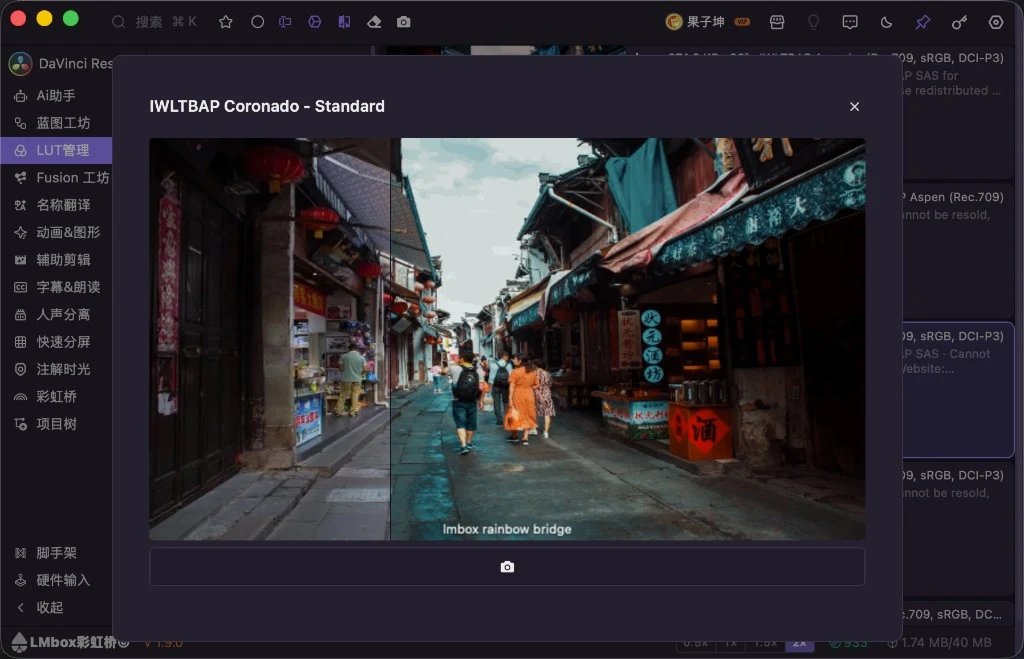
Figure: enlarged preview with before / after compare; you can capture a still in the pop-up. The screenshot shows the Chinese interface.
Right-click menu
Right-click a list item:
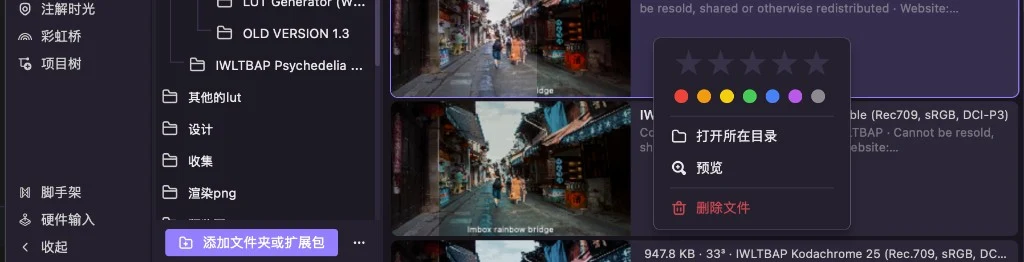
Figure: right-click menu with rating, color label, open containing folder, preview and delete file. The screenshot shows the Chinese interface.
| Item | Description |
|---|---|
| Stars | Rate this LUT, so you can filter your favorites |
| Color dots | Sort by color label |
| Open containing folder | Shows the file in the system file manager |
| Preview | Opens the enlarged compare preview |
| Delete file | Deletes the LUT file from disk (be careful) |
FAQ
Q: Where do I use the member 2000+ LUTs?
A: After you get and deploy the pack, mount it in the LUT library with Add folder or extension pack or by dragging it into the sidebar. Then preview and apply. See "Member bonus" above.
Q: Nothing changes on the timeline after import?
A: Check that the extension is connected and the apply mode in the top bar is right. Premiere Pro: on the clip or an adjustment layer. DaVinci Resolve: source clip Input LUT or grading node. In Premiere Pro, select a video clip; in DaVinci Resolve, put the playhead on the target clip.
Q: What is the difference between "on the clip" and "adjustment layer"?
A: On the clip changes the grade on the selected clip itself. An adjustment layer is a separate layer with the LUT, so you can switch it on and off without touching the clip's own effects. In DaVinci Resolve the equivalents are the source clip Input LUT and the grading node, not an adjustment layer.
Q: Why is the preview not updating?
A: Select a folder or extension pack in the sidebar, then use Capture in the top bar to update the compare original. After you capture, the left side of the compare is the still and the right side should be the graded look. Extension packs work the same way on Windows.
Further reading
- Lab features overview
- Look match: make a local color filter from a source clip plus a reference image
- Install the desktop app
- Public class · LUT library · Bilibili
- Early extension demo · Bilibili
Release notes
2.7.0Fixed capturing a timeline still for commercial extension packs on some Windows computers showing only the original and not the graded look. The compare preview now shows correctly.2.7.0Fixed the color effect sometimes failing to be created when applying a filter in newer Premiere Pro versions. It can now be created and written normally.2.2.0Fixed the list scrolling back to the top after a delete and breaking aggregated browsing. It now stays where it was.1.9.3With DaVinci Resolve connected, the "Input LUT / Look appearance" switch is hidden. Only Premiere Pro shows it.1.9.1Better enlarged preview: double-click a thumbnail or right-click to see a clearer compare picture, and capture a timeline still inside the pop-up.1.7.3Fixed a LUT sometimes not applying when imported to the timeline in newer Premiere Pro versions. It now applies normally.1.5.0Fixed Lumetri color not being added automatically when importing a LUT to the timeline from this page in newer Premiere Pro versions. It now applies normally.1.4.8Fixed clearing the source LUT in DaVinci Resolve doing nothing, switching to the Color page by mistake, or clearing the node LUT by mistake. Source and node are now cleared separately, and source mode is done on the Edit page.0.2.4With DaVinci Resolve connected, the top bar can set the source Input LUT on the playhead clip, or apply the node LUT.0.2.4The capture button supports Shift-click to remove a custom compare original.0.2.4Fixed "Apply on adjustment layer" in Premiere Pro showing "could not create" even though the adjustment layer appeared on the timeline, or stacking two layers. After it succeeds, your original clip selection is restored.0.2.4Fixed the compare picture in the list not refreshing on Windows when updating the preview of a commercial extension pack with a timeline capture.0.2.3The top bar switches choose between applying to the current clip or a new adjustment layer, and between Input LUT and Look appearance. Double-click a list item to import.0.2.3The top bar can save the current timeline picture as the preview reference of the folder selected in the sidebar, and the list compare updates with it.0.2.3Double-click import to the current timeline clip in DaVinci Resolve is supported.0.2.3When applied to an adjustment layer, the layer length matches the selected clip and it is named after the filter, as in the older LmBox extension.0.2.3Fixed "Import to timeline" not applying the filter after selecting a timeline clip in newer Premiere Pro versions.0.2.3Fixed importing failing with the adjustment layer on, clearing the Look appearance doing nothing, and the adjustment layer length not matching the selected footage.