
Screen record

"Screen record" in LmBox records the screen right inside the app. Screen, microphone and camera land on separate tracks. After recording you tidy them on the timeline, let the picture zoom in automatically on your mouse clicks, and export the finished video. It suits software tutorials, walkthroughs and demos. Open from the sidebar.
Video tutorial
What you will learn
- Choose a source, start recording, and use the floating bar on the screen
- How screen / camera / microphone appear on separate timeline tracks after recording
- Use "Suggest zoom follow" to zoom in on clicks automatically, then export
Guide
This is the main Lab guide. Before you record, allow the system permissions for screen recording, microphone and so on. Some labels on this page are still shown in Chinese in the app today, so the English names below follow the Chinese labels.
Where to find it
- Open the LmBox desktop app
- In the sidebar, under "Edit assist", open
- If Get this feature shows in the top bar, unlock the feature on your account before you record
Both Mac and Windows can record the main screen.
Permissions
The first time you record, the system asks for permission for screen recording, microphone, camera and so on. Suggesting zoom follow needs the click positions to be recorded, so on Mac please turn on Accessibility. If a permission is missing, the bottom bar tells you; you can also check again in Settings.
The screen
The preview is on the left, the settings on the right, and the timeline at the bottom. The top bar has Start recording, the current canvas size and frame rate, and Export.
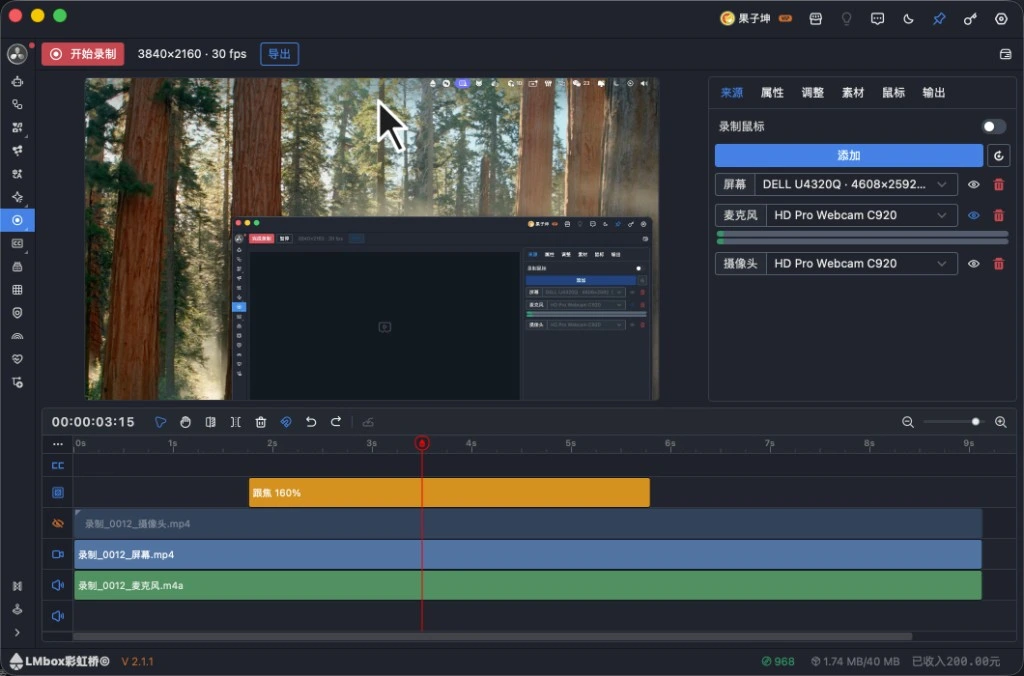
Figure: Screen record with the preview, the sources on the right, and zoom-follow segments on the bottom timeline. The screenshot shows the Chinese interface.
Areas
| Area | What it does |
|---|---|
| Top bar Start recording | Counts down 3, 2, 1 and starts. While recording, use the floating bar on the screen to control it |
| Top bar size and frame rate | The canvas size and frame rate of the finished video, for example 3840×2160 · 30 fps |
| Top bar Export | Exports the finished video from the current timeline (including zoom follow and the cursor overlay) |
| Preview on the left | Shows the picture, the zoom follow and the cursor added in post |
| Right panel | Sources / Properties / Adjust / Media / Mouse / Output |
| Timeline at the bottom | Tidy the separate tracks. Zoom-follow segments sit on the Adjust track, labelled like "Zoom 160%" |
Sources
There are three by default: Screen, Microphone and Camera. Click Add to add things like System audio. Each one can switch device, and the eye icon flashes on the matching screen so you can confirm which one is recorded.
Record mouse is off by default: the system pointer is not burned into the screen picture. Off is cleaner, and you can add a bigger cursor later on the "Mouse" tab. If you turn it on, the system pointer is in the picture. Zoom follow uses click positions and does not depend on this switch.
Each recording is saved separately by source, for example a video for the screen, an audio file for the microphone, and a video for the camera. When you keep it, it lands on the timeline aligned automatically.
The floating recording bar
When you enter this page, a small draggable bar appears at the top of the screen (it is not part of the finished video). After you click Start in the top bar, use it to pause, resume and watch the timer.
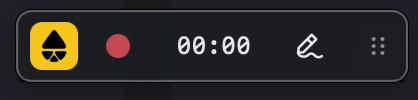
Figure: the floating recording bar with back to main window, recording indicator, timer, ink and drag. The screenshot shows the Chinese interface.
From left to right:
| Button | What it does |
|---|---|
| Yellow icon | Back to the LmBox main window |
| Dot | Start / pause |
| Timer | How long you have recorded |
| Pen | Turns the Ink overlay on or off; what you draw goes into the screen picture |
| Six dots | Drag the whole bar |
You can switch to other LmBox pages while recording and the bar stays. When you finish, you come back to this page and choose Keep or Delete, and can rename it. When you close the main window the bar closes with it; if you are recording, you get a warning first. Clicking the desktop icon, the tray or the taskbar still opens the main window.
Mouse zoom follow
After recording, switch to Adjust in the right panel. The app lays out zoom-follow segments on the Adjust track of the timeline from the clicks recorded this time, and the picture zooms in following the pointer.
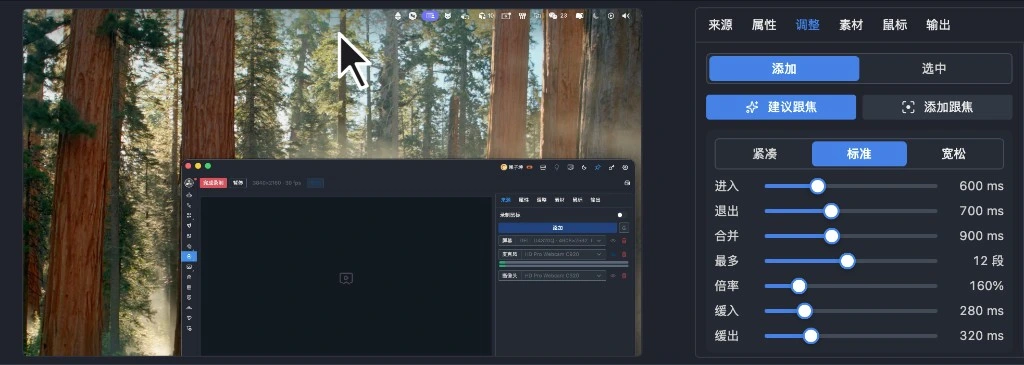
Figure: the Adjust panel with Suggest zoom follow, Add zoom follow, and Tight / Standard / Loose. The screenshot shows the Chinese interface.
| Item | Description |
|---|---|
| Suggest zoom follow | Builds several segments from the clicks automatically. With no click record, the bottom bar says so |
| Add zoom follow | Adds one segment by hand at the playhead |
| Tight / Standard / Loose | Three presets for denser or sparser segments |
| In / Out | How long before a click it starts zooming in, and how long after a click it zooms out |
| Merge | Joins two clicks that are close together into one segment |
| Max | The most segments one suggestion can make |
| Zoom level | How much it zooms in, for example 160% |
| Ease in / Ease out | How smooth the zoom in and zoom out are |
Click a zoom-follow block on the timeline to change the zoom level and easing of that segment. The preview applies the picture layout first, then the zoom follow.
Other right-panel tabs
| Tab | What it does |
|---|---|
| Properties | After you select a clip, fine-tune the picture crop and the picture-in-picture position |
| Media | Videos, images and audio from this recording and ones you dropped in; drag them onto the timeline again |
| Mouse | Adds a cursor on top in the preview and export: switch, click effect, size, smoothing, style |
| Output | Export quality (Draft / Standard / HD / Original) and sound options |
When you are happy with the arrangement, click Export in the top bar. You cannot export when there is no picture on the timeline.
FAQ
Q: I clicked Start and nothing happened?
A: Check whether the top bar needs you to unlock the feature first, and check the screen recording and microphone permissions. On Mac, if it is still blocked after you allow the permission, quit LmBox completely and open it again.
Q: Suggest zoom follow produced nothing?
A: First check that you clicked the mouse during this recording and that Accessibility is on. You can also Add zoom follow by hand first.
Q: Will the floating bar be recorded?
A: No. Ink drawings do go into the picture.
Q: Where are the files after recording?
A: In the current project folder. You can change the save location on the page. When kept, they are stored by "name_source".
Further reading
Release notes
2.1.1When you close the main window the recording bar closes with it. If you are recording, you get a warning first, and clicking the desktop icon, the tray or the taskbar still opens the main window.2.1.0The sidebar can open Screen record, so you can record, tidy and export inside the app.