
Blueprint lab


"Blueprint lab" in LmBox is a flow board you can wire up. Drag nodes out from the left, connect them with lines, press Run, and the whole "get footage → recognize / generate / rough cut → write back to the editing app" flow runs in one go. It connects many LmBox features (captions, rough cut, OGraf / Lottie, timeline import and more). This page explains how to use the lab first; detailed notes for each node will be added over time. The sidebar icon is .
Video tutorial
Public class demo: copy the local connection keyword and hand it to an agent to build a blueprint for you, still-frame image-to-image into the timeline, and notes on the Keychain and external tools. Open on Bilibili
What you will learn
- What the canvas, the preset node library, and the top bar's save and run do
- The main kinds of nodes (input, generate, get, import…)
- Common use cases: talking-video rough cut to the timeline, mask sensitive words, one-sentence OGraf
- How to connect an external agent over MCP, then build blueprints and run nodes by talking
- How to save and reuse in Projects / Presets
Guide
This is the main Lab guide (overview). OGraf generation and graphics library management work together with Motion graphics (OGraf / Lottie). For the word-level rough cut screen, see Talking rough cut.
This guide keeps growing
Blueprint nodes cover a lot of ground. We will add screenshots and steps by topic ("generate / rough cut / import" and so on). If your version has extra nodes, follow what the app shows.
The desktop screen
Open from the sidebar. On the left is the preset node list and in the middle the canvas. Drag nodes onto it, connect the ports with lines, then click Run at the top right.
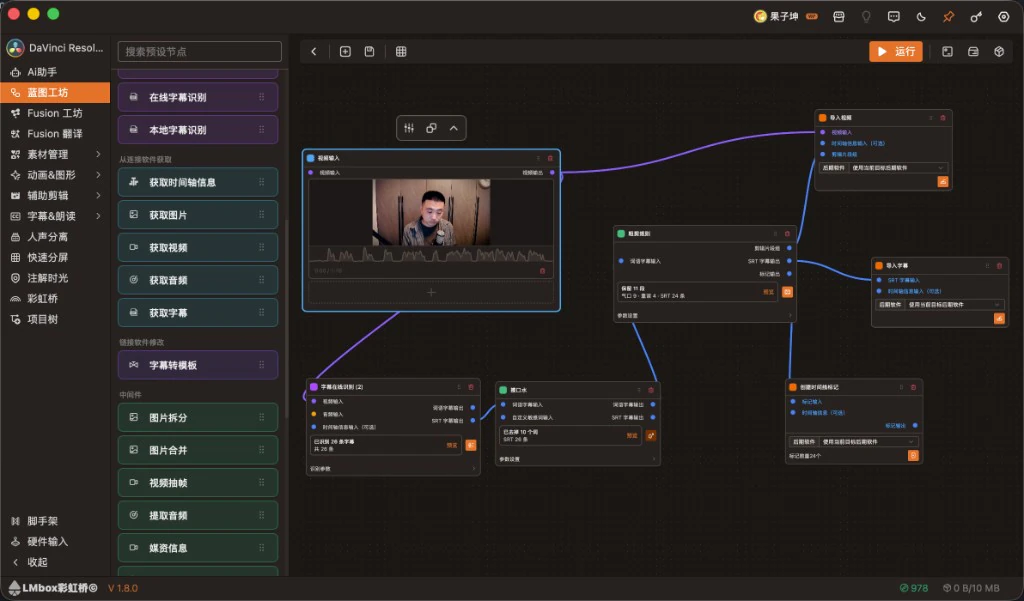
Figure: the preset node library + canvas wiring. The example is: Video input → Online subtitle recognition → Smart cut rules → Filler clean → Import video / Import subtitles → Create timeline markers. The screenshot shows the Chinese interface.
Screen areas
| Area | What it does |
|---|---|
| Preset nodes on the left | Lists draggable nodes by category; searchable; you can hide or show this column |
| Canvas in the middle | Place nodes and draw lines; double-click a node title to collapse or expand it |
| Top bar | New, save, Projects / Presets, arrange canvas, Run / End |
| Ports on a node | Mostly inputs on the left and outputs on the right; only matching colored types connect |
Common top bar actions
| Name | What it does |
|---|---|
| New blueprint | Clears the current canvas and starts over |
| Save project | Saves the current wiring to Projects so you can load it next time |
| Projects | Opens the list of saved projects |
| Presets | Saves or imports node groups you can share |
| Arrange canvas | Tidies up node positions automatically |
| Run | Runs in the order of the lines; shows progress, and on failure you can end or continue from the break point |
| Get this feature | Shows when it is not unlocked (write-back features are tied to the Lab bundle; follow the screen) |
Preset node categories (overview)
The left list is grouped roughly like this (names follow the app):
| Category | Common nodes (examples) | What they are for |
|---|---|---|
| Media input | Image / Audio / Video / Subtitle input | Bring local files or upstream results into the flow |
| Generate | Text / Image / Sticker / Animated image, OGraf graphic generation, Lottie graphic generate, Video generation, SFX music generate, Online / Local subtitle recognition, Text-to-speech, Voice clone | Produce new content with models or recognition. SFX music generate can make a song or a short sound effect; text-to-speech and voice clone synthesize audio |
| Get from connected app | Get timeline info, image, video, audio, subtitles | Take content from the connected DaVinci Resolve / Premiere Pro / After Effects |
| Import to connected app | Import image / video / audio / subtitles, Import OGraf graphic, Import Lottie graphic, Run script | Write results back to the editing app. Run script can replay steps you already did in DaVinci Resolve (needs 21.1) |
| Middleware and more | Smart cut rules, Breath cut, Filler clean, Media info, Extract frames, Note, Constant, Gate, Delay… | Process in the middle. Note / Constant / Gate / Delay are for comments and for controlling the text chain (may change by version) |
| Connected app edits | For example Create timeline markers | Add points or change markers on the host timeline |
Note
Before you run, check that the target editing extension at the top is connected, and that the project / timeline the nodes need is open. Generate nodes usually need a Keychain and a model to be chosen first.
Getting started examples
Example A: rough cut a talking video, then import to the timeline
Good for: a talking video where you want captions recognized, pauses and fillers removed, and then written back to DaVinci Resolve or Premiere Pro.
- Drag in Video input and pick the footage
- Connect Online subtitle recognition or Local subtitle recognition
- Connect Filler clean and Smart cut rules (as needed)
- Then connect Import video and Import subtitles; add Create timeline markers if you need
- Click Run and watch whether each node runs through
If you do not need captions and only want to cut pauses by waveform, go straight Video input → Breath cut → Import video (run Breath cut first, then import).
The desktop screen above shows this kind of wiring. To edit keeps and cuts in detail on the word-level view, use the Talking rough cut page.
Example B: make OGraf from one sentence and import into DaVinci Resolve
Good for: DaVinci Resolve 21 fancy text or title cards, made from natural language and then placed on the timeline.
- Drag in OGraf graphic generation and fill in the Graphic prompt (you can pick a layout type and set the duration first)
- Connect the list output and the script output to Import OGraf graphic
- Choose the current editing app as the import target (the DaVinci Resolve LmBox connection must be online)
- Click Run. You can also put the result in the Motion graphics (OGraf / Lottie) library and keep tuning the parameters
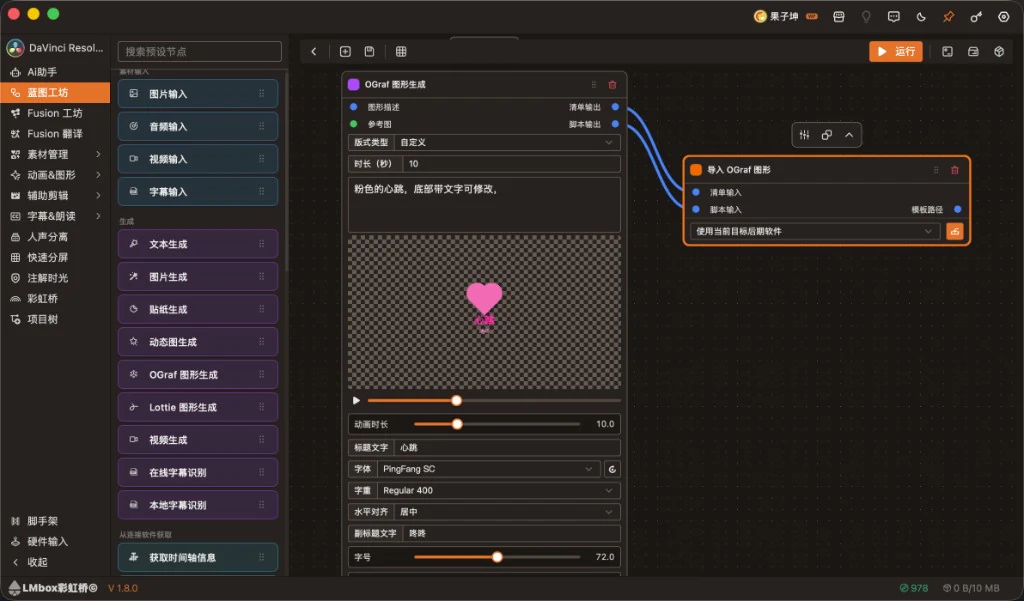
Figure: OGraf graphic generation → Import OGraf graphic. For finer parameter tuning and library management see the Motion graphics (OGraf / Lottie) guide. The screenshot shows the Chinese interface.
Example C: mask sensitive words in a talking video with beeps
Good for: a talking video that must pass review. Clean the fillers, beep out the sensitive words, then import.
- Drag in Video input and pick the footage
- Connect Online subtitle recognition or Local subtitle recognition
- Split into two paths: the top one goes Filler clean → Import video; the bottom one goes Detect audio sensitive words → Import audio
- Click Run and make sure the target editing extension is connected
Example D: let an external agent build the graph for you
Good for: when you do not want to drag nodes from scratch and would rather tell Cursor, Claude or a similar agent what you need.
- First connect LmBox by following Connect an external agent over MCP below
- In the agent, state your goal, for example: "Connect to LmBox and create a blueprint project in Blueprint lab that masks sensitive words"
- Ask it to run a health check first, then build the nodes, pick local files, and run all of it or just one step
- If you do not like the result, edit the wiring by hand on the canvas and click Run again
Use cases
| Case | Who it is for | How to chain it (sketch) |
|---|---|---|
| Talking rough cut to the timeline | Talking or commentary videos where pauses and fillers should go before the timeline | Video input → Subtitle recognition → Smart cut rules / Filler clean / Breath cut → Import video, subtitles |
| Mask sensitive words | Review, or platform-sensitive words that need beeps | Video input → Subtitle recognition → Filler clean → Import video; another path: Detect audio sensitive words → Import audio |
| One-sentence fancy text | DaVinci Resolve name bars and title cards | OGraf graphic generation → Import OGraf graphic (DaVinci Resolve must be connected) |
| Agent builds blueprints | People who like to give orders in Cursor or Claude | Turn on external agents in Settings → paste the connection keyword → build graphs and run nodes by talking |
| Shot / sound search | A local footage or sound library to search by meaning | Build video / audio features → Find shots / Find sounds → Place shots and so on |
| Reading aloud and cloning | Narration or voice-over to put on the track | Text / subtitles → Text-to-speech or Voice clone → Import audio |
| Score as a song / short sound effects | Opening and closing music, B-roll music or foley | SFX music generate → Import audio |
In daily use we still suggest: after one flow runs, Save project; to reuse it with a teammate, also store it in Presets.
Connect an external agent over MCP
The LmBox desktop app can let an external agent connect to your computer and use Blueprint lab over MCP: build graphs, edit nodes, pick local files, run the whole graph or just one step.
Steps
- Open the LmBox desktop app → Settings → Local connections
- Turn on the External agents switch (usually on by default)
- Click Connection keyword and copy the prompt and address
- Paste it into the chat of Cursor, Claude or a similar agent, and ask it to do a health check first to confirm it is connected
- Then ask it to look at the node catalog, create or open a project, wire the nodes and run
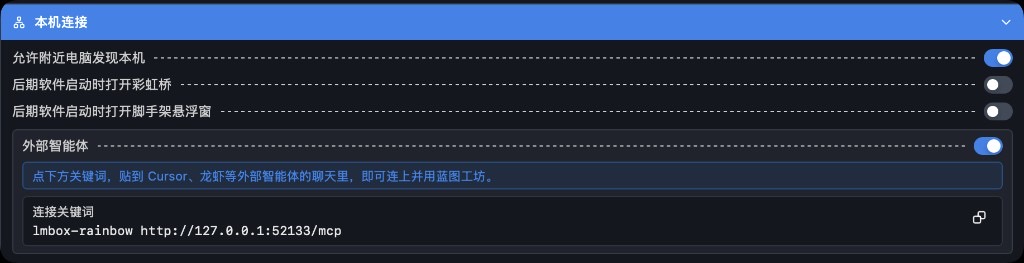
Figure: Settings · Local connections. After you turn on external agents, click the connection keyword to copy it. For more on local connections see Settings · Local connections. The screenshot shows the Chinese interface.
What you can do once connected
- Pick local files for input nodes, and look at the settings of a single node
- Run only one node, or continue from one step to the end
- Run steps that need waiting, such as image, sticker and cutout generation
- Open feature pages from the sidebar, so it is easy to find the entry
- When reading a project, see the graph summary and the last run result (the node catalog comes with names in the current language)
Tip
After you turn off "External agents", outside tools can no longer connect. The local address is whatever the connection keyword in the app says; the port may change when the app starts.
Recommended daily use
- Install and open the LmBox desktop app
- Connect the DaVinci Resolve, Premiere Pro or After Effects extension
- Open Blueprint lab → drag nodes from the preset nodes and connect them
- For generate nodes, pick a Keychain / model → Run
- After a flow runs, Save project; to share with a teammate, store it in Presets or export a preset file
FAQ
Q: What is Blueprint lab for?
A: It chains many LmBox features with nodes into one runnable flow, so you click around between pages less.
Q: How does it relate to the "Motion graphics (OGraf / Lottie)" and "Talking rough cut" pages?
A: Blueprints "chain things and run them automatically". Motion graphics (OGraf / Lottie) is about managing the template library, and Talking rough cut is about detailed word-level editing. They work together and do not replace each other.
Q: There are so many nodes. Where do I start?
A: Practice with the starting examples: talking rough cut to the timeline, mask sensitive words, or one-sentence OGraf. Then add nodes from the left categories.
Q: What are an external agent and MCP?
A: You hand LmBox to Cursor, Claude or a similar tool and build blueprints and run nodes by talking. Turn on external agents in Settings → Local connections and copy the connection keyword. See "Connect an external agent over MCP" above.
Q: Why does a run usually fail?
A: The extension is not connected, no model is chosen, the wiring has a loop, or an upstream node produced nothing but is wired to an import node. Read the hint on the failed node, and if needed End, fix the lines and run again. If the agent cannot connect, first check that the external agents switch is on and do a health check.
Q: Will all Lab features be in blueprints?
A: The goal is to connect as much of the project as possible. The exact nodes follow the list in your current version, and the guide will be filled in batch by batch.
Further reading
- Blueprint lab overview (landing page)
- Settings · Local connections: external agents and the connection keyword
- Lab features overview
- Motion graphics (OGraf / Lottie): library management for OGraf / Lottie and how it links to blueprint generation
- Fusion Lab: DaVinci Resolve Fusion on demand and the community
- Talking rough cut: the word-level rough cut screen
- Public class · Bilibili
- Install the desktop app
Release notes
2.9.0When you reopen a project, the last canvas zoom and position are remembered.2.8.0OGraf graphic generationandLottie graphic generatenow work with thinking models such as DeepSeek.2.8.0SFX music generatecan switch between a song and a short sound effect, on the same route asScore & SFXin the sidebar.2.8.0Fixed taking audio still using the old file after you changed in/out points or tracks, and side tracks leaking in. It now exports again by the chosen range and tracks.2.7.0NewSFX music generatenode: write a style or lyrics to make a song, two at a time, preview them and connect to import audio.Public classThe desktop video tutorial is now BV12RYU6vEMm (getting started with Blueprint lab: an agent builds the flow, and image-to-image demo).2.6.0NewRun script: turn steps that already worked in DaVinci Resolve into a node, then replay them in the lab in one click (needs DaVinci Resolve 21.1).2.5.0NewBuild video features,Build audio features,Find shots,Find soundsandPlace shots: build features for your local footage and sound library first, then find similar shots with text, pictures or video, find sounds by description, and place them on the current timeline.2.5.0NewBreath cutnode: remove pauses in a talking video by waveform, then connect to import video to place the kept parts on tracks.2.4.2NewText-to-speechnode: connect text or subtitles and synthesize with an official voice. Free text makes one clip, subtitles go sentence by sentence, and on import they can be placed on tracks by subtitle time.2.4.2NewVoice clonenode: connected like text-to-speech, synthesizes with a saved cloned voice; subtitles can be placed sentence by sentence.2.4.2Text-to-speechandVoice clonelet you pick the voice in a pop-up, and fold away speed, pitch and volume inside the node. Multi-sentence results preview as info cards, and the output list in the sidebar can be previewed on hover.2.4.2Middleware addsNote,Constant,GateandDelay: Note is only a comment; Constant can switch between text / number / boolean (the output is still text); Gate can shut the downstream text chain; Delay can set the pace.2.4.2After closingGate, a full run skips the downstream nodes, so errors no longer land on read-aloud nodes by mistake.2.4.2The node catalog opened to MCP comes with names in the current language, and reading a project shows the graph summary and the last run result.2.4.0After you import clips into the editing app, you can connect the next "get" step and read the edited audio or subtitles.2.4.0Fixed the node being empty when getting video from the connected app. It now reads the clips selected on the timeline.2.4.0Agents over MCP can run just one node, or continue from one step to the end.2.4.0Agents over MCP can run steps that need waiting, such as image, sticker and cutout generation.2.4.0Agents over MCP can open feature pages from the sidebar, so beginners find the entry.2.4.0Agents over MCP can pick local files for input nodes and look at the settings of a single node.2.1.3Image generationcan make pictures from text or redraw from a reference image; withMask paintconnected, only the painted area changes.2.1.3Fixed getting images in DaVinci Resolve only reading the timeline and not the picture. The current frame can now be grabbed normally.1.9.3Node waveforms and graphic previews now stop when they end by default, and a loop switch is next to Play.1.6.0Text / graphic template / image and sticker nodes can use "Official cloud / Golden key", so you do not need your own model key.1.4.0NewFiller cleanandSmart cut rulesmiddleware nodes: handle verbal tics before export and rough cut automatically by rules.1.3.2TheOGraf graphic generationandLottie graphic generatenodes add layout / animation type recipes (such as name bars, loading and transitions). Pick a type first and then write what you need, so a usable graphic is more likely on the first try.0.2.9New DaVinci Resolve motion and graphic template generation nodes: preview parameters and the picture inside the node, and import to the DaVinci Resolve timeline.0.2.7The offline pack supports local cutout, so Blueprint lab can remove backgrounds from images.0.2.7New sticker generation node: one click makes transparent stickers, and for several it can output a sheet and the split single stickers separately.0.2.5New video generation node, sharing the Keychain and models withAgentvideo generation: make and preview a video in one click on the canvas.0.2.5The top bar can run the whole blueprint in wiring order in one click, and stops automatically if a step fails.0.2.5New asset library: generated and uploaded images, videos, audio and subtitles are browsable in one place. Drag them to the canvas or a node input area to fill them in.0.2.0When you create a new "Text generation" or "Image generation" node, it reuses the Keychain and model you last used on that kind of node.0.2.0New "Get from connected app" node: with an editing extension connected, it reads a timeline summary and outputs the picture, video, audio and subtitles on separate ports, so they connect well with downstream nodes.0.2.0New "Import to connected app" node: sends upstream images, videos, audio or subtitles back to the connected editing extension; you can also connect timeline info to match the import timing.0.2.0Nodes support double-clicking the title row to collapse into a compact view; when expanded you can adjust the card width and height in the sidebar or restore the default in one click.0.2.0Footage reading and import back to the editing extension now follow the same flow asMediaimport to the extension, so track placement and paths are more consistent and easier.