
Motion design


"Motion design" in LmBox (the page title in the app is "Motion") lets you set the motion direction and curve on the desktop. When the preview looks right, one click sends the animation to the connected editing extension, which writes it onto the selected clip on the timeline. It fits entrances, exits, or an emphasis at one moment (bounce back and forth and so on). The sidebar icon is .
Video tutorial
What you will learn
- Choose clip start / end / current time, then set the anchor, position, rotation and scale
- Pick spring, ease and other types, and tune duration and curve parameters
- Use align and distribute to tidy several clips
- Save presets, apply the motion and clear keyframes
Guide
This is the main Lab guide for the LmBox desktop app. Screenshots on this page show the Chinese interface. You can switch the app to English in Settings. Some animation type names in the app are still shown in Chinese today, so the English names below follow the Chinese labels.
What it solves
| Pain point | What this page does |
|---|---|
| Hand-making springy keyframes in post is slow and hard to tune | Pick a direction and a curve type, preview, and write with one click |
| Entrance / exit / emphasis need different rhythms | Clip start / Clip end / Current time + in / out / back-and-forth types |
| Several clips must be aligned and distributed | The align toolbar does left / center / right, top / middle / bottom and distribute in one click |
| You want to reuse common settings | Save in Presets and pick them next time |
Before you start
- Pick the target editing app in the sidebar (Premiere Pro / DaVinci Resolve), and the extension icon should be lit.
- Select the clip to animate on the timeline (do not use the align tools on caption clips).
- Save your project first. If the clip already has animation, clear it before you apply again.
The desktop screen
Open from the sidebar. From top to bottom: in/out points and transform → duration → align and apply → curve and parameters → preview stage.
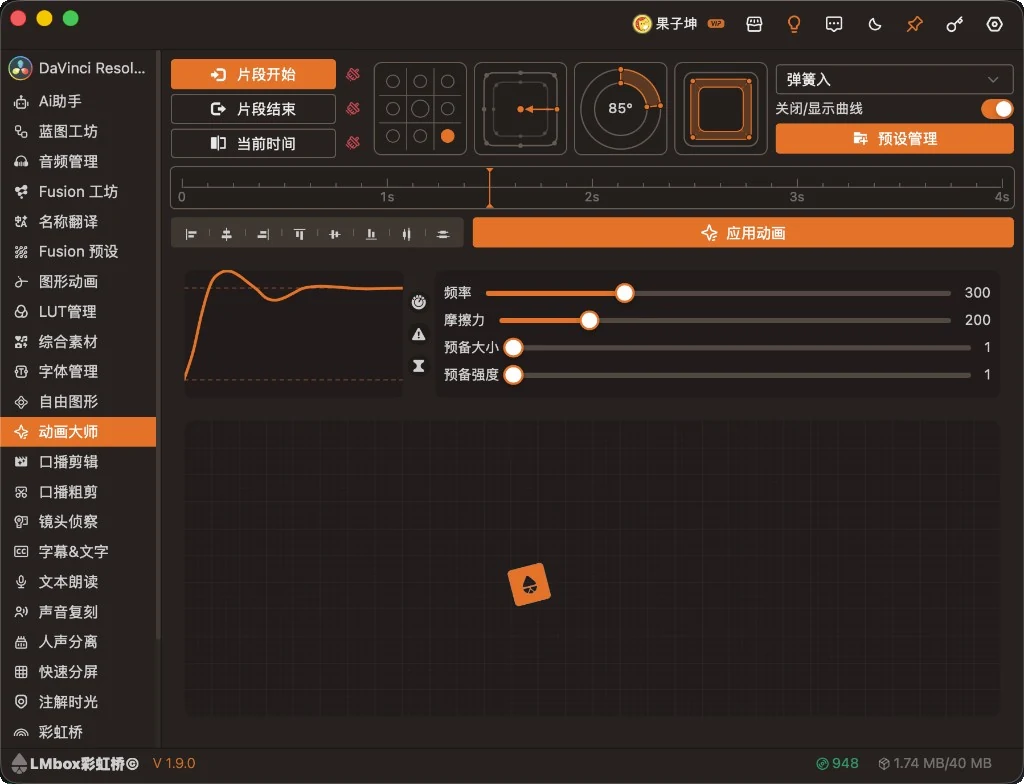
Figure: clip start / end / current time, transform controls, the "Spring in" preset, the duration bar, align and "Apply motion", curve parameters and the preview. The screenshot shows the Chinese interface.
Screen areas
| Area | What it does |
|---|---|
| Clip start / Clip end / Current time | The animation lands at the clip's in point, out point, or the moment of the playhead. The clear button beside each one clears the matching keyframes |
| Anchor 3×3 grid | Sets the motion reference point (such as top-left, center, bottom-right) |
| Position | Move in or out from top / bottom / left / right / corners ("None" means no position animation) |
| Rotation | A preset angle or fine-tune with the dial; "None" means no rotation |
| Scale | Small to large / large to small / none, plus strength levels |
| Animation type dropdown | Spring in, ease in, bounce back and forth and so on (see the tables below) |
| Show or hide curve | Opens or closes the curve and parameter sliders |
| Save, pick and delete presets on your computer | |
| Duration bar | The time from start to end of the animation (about 0 to a few seconds, draggable) |
| Align toolbar | Left / center H / right, top / middle / bottom, distribute horizontally, distribute vertically |
| Sends the current settings to the editing extension and writes them to the selected clip | |
| Curve chart + sliders | Tune frequency, friction, elasticity and so on by type; the stage below previews live |
Recommended workflow
- Click Clip start, Clip end or Current time to set where the animation lands.
- As needed, set the anchor, position, rotation and scale (set at least one kind of motion, or you cannot apply).
- Pick an animation type in the dropdown (such as Spring in), drag the duration bar, and open the curve to tune the sliders if needed.
- Check the effect on the preview stage. With several clips, use the align toolbar to tidy up.
- Select the target clip in your editing app and click Apply motion.
- Name and save the combinations you use often in Presets.
TIP
Save the project before applying. To change an existing animation, clear the old keyframes with the clear button beside each row first, then apply again.
Animation types
Note
"In / out" here describes how the curve starts and ends. It is not the clip's in and out points.
"Back and forth" types start from the current position and return to the origin, which suits emphasis at one moment.
Good for entrances
| Name | Feel |
|---|---|
| Spring in | A damped bounce that gradually settles on the target |
| Gravity in | An elastic rebound after a hit |
| Ease in | A slow start, then speeds up into place |
| Anticipate ease in | Pulls back a little, then releases, with a feeling of winding up |
Good for exits
| Name | Feel |
|---|---|
| Spring out / Gravity out / Ease out / Anticipate ease out | The opposite exit rhythm to the matching "in" |
Good for both
| Name | Feel |
|---|---|
| Linear | Constant speed all the way |
| Ease in and out | Fast in the middle, slow at both ends |
| Anticipate ease in and out | A small pull-back at both ends |
Good for emphasis at the current time (back and forth)
| Name | Feel |
|---|---|
| Bounce forward / reverse, back and forth | Leaves, then rebounds and decays; good for emphasis |
| Anti-gravity forward / reverse, back and forth | Similar to the gravity types, back and forth for emphasis |
Different types show different sliders. Spring often uses frequency, friction, anticipation size and anticipation strength. The gravity types usually have elasticity and elasticity level. After tuning you can restore the default parameters in the curve area.
Align and distribute
After you select several clips on the timeline, use the align toolbar:
| Feature | Description |
|---|---|
| Left / center H / right | Horizontal alignment |
| Top / middle / bottom | Vertical alignment |
| Distribute horizontally / vertically | Evenly spaced layout |
After it succeeds, the bottom bar says the alignment was applied. Do not use it on caption clips.
Presets
- After you tune the type, transform and curve, open Presets.
- Enter a name and save. You can pick or delete it from the list.
- If saving fails, open the curve area first and try again.
If you also use the compact version in the tool rack, you can use your saved presets there too.
FAQ
Nothing happens when I click "Apply motion"?
Check that the extension is connected, a clip is selected on the timeline, and at least one of position, rotation or scale is set.
It asks me to claim the feature or sign in?
This feature may need a Lab benefit. Follow the prompt on screen to claim it or sign in, then try again.
In/out point animations are hard to edit in DaVinci Resolve?
Newer desktop versions write them in a better way, which makes them easier to keep and fine-tune. Keep LmBox and the extension up to date.
Release notes
0.1.9Fixed in/out point animations applied while the DaVinci Resolve editing extension is connected being hard to keep on the clip and hard to fine-tune later. They now land on the current clip as expected and are easy to adjust.