
Sound library


"Sound library" in LmBox manages the sound effects and audio files on your computer. Mount local folders or extension packs on the left, and the list in the middle shows waveforms right away. Hover to listen, double-click a waveform to enter selection editing, mark the part you want, then import it into the connected editing app. The sidebar icon is .
Video tutorial
Public class demo: the full Sound library workflow. Open on Bilibili
What you will learn
- After connecting the editing extension and the transcoding tool, how to mount a library, preview and import
- The top bar: project folder, translated name switch, search, favorites
- Double-click waveform editing: drag a range and handles, preset ranges, forward / reverse (pitch kept), then drag into your editing app
- Name translation, semantic search by features, and the "Audio & waveform" settings
Guide
This is the main Lab guide for the LmBox desktop app. For how to set up the transcoding tool, see Configure the transcoding tools in the desktop install guide.
What it solves
| Pain point | What this page does |
|---|---|
| A sound library of tens of GB cannot be scanned at a glance like pictures | The list has waveforms, and hovering plays them, so you open an outside player less |
| English file names are hard to remember | Automatic translated names (built-in word list, with optional cloud or model help) |
| A file is too long and you only need one part | Double-click the waveform to open selection editing, mark a range, then import |
| You want to search "a heavy door slam", not a file name | After building local search features, use search by description |
| Sounds need to go onto a Premiere Pro / DaVinci Resolve / Final Cut timeline | With the matching extension connected, import the whole file or only the selection |
| You want to drag into any editing app, at any spot | Drag the selection out or drag from the info area and drop it anywhere on the timeline (including apps without an extension connection) |
Before you start
- Connect the editing extension (when you want to import to the timeline): pick the target editing app in the left sidebar; a lit icon means connected. For install and switching see Plug-in manager.
- Transcoding tool (to show waveforms or preview less common formats): go to and Download and install is recommended. Details: Configure the transcoding tools.
- If you only browse your library and do not import yet, you can skip step 1.
The desktop screen
Open from the sidebar. On the left is the media sidebar (editing sounds / local folder tree) and on the right the audio list (waveform + name, format, duration, size). After you double-click a waveform, the selection editing drawer slides up at the bottom of the main area.
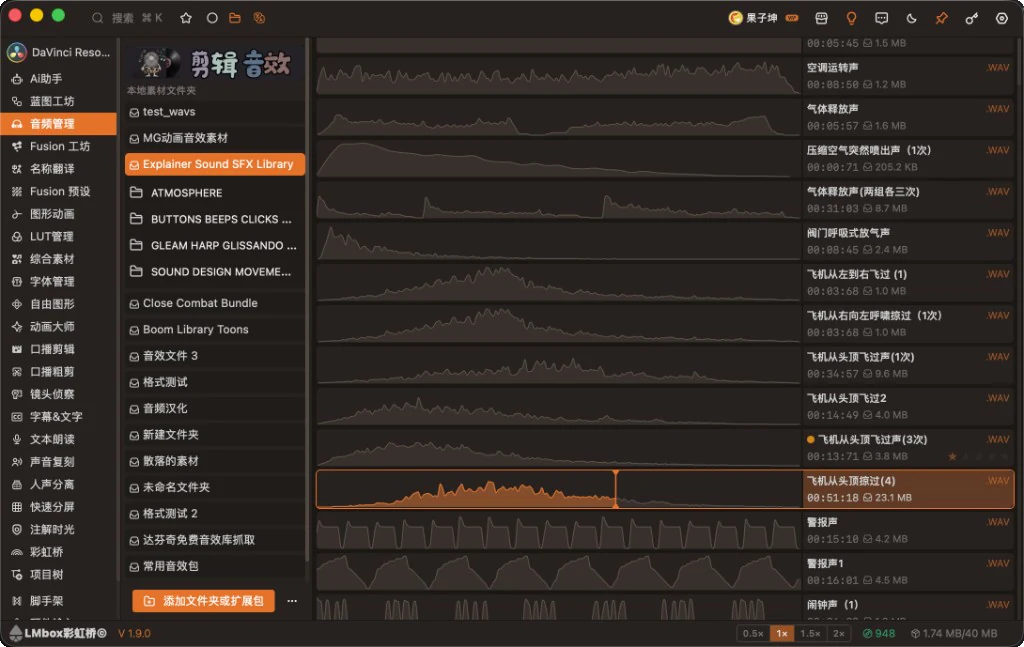
Figure: Sound library on the desktop, with the folder tree on the left and the list waveforms on the right; the orange selection handles show on the selected row (list preview state). The screenshot shows the Chinese interface.
Screen areas
| Area | What it does |
|---|---|
| Feature nav on the left | Lab entries such as |
| Media sidebar | Local root folders, subfolders, commercial extension packs; at the bottom |
| Audio list | Each row has a waveform on the left and file info on the right; hover to listen, click the waveform to jump, double-click to open the editor |
| Selection editing drawer | Slides up after a waveform double-click: big waveform, sound/silence preset strip, preview and import actions |
Common top bar entries
The top bar of the sound page (shared with the other media labs) also has:
| Icon | Name | What it does |
|---|---|---|
| Build search index | Builds local features for the current sound library, used by search by description and "Find similar". While building it turns red as a stop button; you can stop any time and finished work continues next time | |
| Project folder | The local project folder that "Copy and import" copies into; click here to pick it if not set | |
| Translated / Original name | Switches the list titles and the clip names imported to the timeline between the translated and original name (automatic translation must be on and translated names generated) | |
| Search | Opens the search dialog (by name / by description / by picture) | |
| Favorites | View starred sounds; you can filter by star level |
Color label filters and similar entries sit in the same top bar area as favorites, so you can filter quickly by color.
Add local folders and extension packs
There are two common ways:
- At the bottom of the sidebar click and pick a folder in the system dialog.
- Drag in many at once: select several sound root folders in Finder / File Explorer, drag them onto the dashed drop area in the main area (the hint icon is ), and let go to add them.
Next to the drop area the supported audio and container suffixes are listed. The full list (same as in the app):
| Category | Suffixes |
|---|---|
| Common lossy | .mp3, .m4a, .aac, .ogg, .opus, .wma, .mp2 |
| Lossless / PCM | .wav, .flac, .aiff, .caf, .wv, .tta |
| Surround / broadcast | .ac3, .eac3, .dts |
| Transport stream / raw stream | .ts, .alaw, .ulaw |
| Video containers with an audio track | .mp4, .mov, .mkv, .webm, .flv |
Some less common formats may need the local transcoding tool the first time you show a waveform or preview. If the list says a waveform cannot be made, go to → and set it up. You can click Download and install to fetch it from the cloud and write the path. Steps: Configure the transcoding tools.
If a folder has the structure of a commercial extension pack, it is added through the extension pack flow; an ordinary media root is registered as a local folder.
After it is added, open a subfolder in the tree and the list on the right loads the audio of that level.
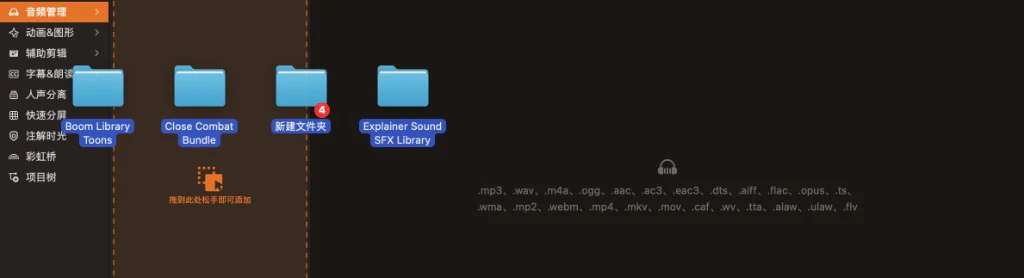
Figure: drag several sound folders onto the dashed area and let go to add them in bulk. The screenshot shows the Chinese interface.
Product note
Free accounts have a limit on how many root folders can be managed; when you select many, folders over the limit may be skipped. Multiple roots, drag sorting, pinning and similar abilities depend on your account benefits. Extension packs need you to be signed in with the matching benefit before you can browse them fully.
Preview and import in the list
The list is the main place for everyday browsing. You can find sounds and place them on the timeline without opening the editor first.
| Action | Description |
|---|---|
| Hover over the waveform | Starts previewing; move away to pause (same as the onboarding) |
| Click the waveform | Jumps to the clicked position and keeps playing |
| Double-click the waveform | Opens selection editing at the bottom (see the next section) |
| Drag from the info area | Drag to an outside editing app / folder. Formats the editing app does not support cannot be dragged in; right-click and choose Transcode and import |
| Right-click menu | Right-click a row: rating, color label, Find similar, Show in folder, Copy and import, Transcode and import, Delete |
The bottom of the list has common speed options (such as 0.5× / 1× / 1.5× / 2×) to scan long footage quickly.
Hover to play (default)
Move the pointer over the waveform area of a row and it starts previewing, with no need to press a play button first. The current position is an orange vertical line, the part already played has a light orange fill, and the whole row usually gets an orange outline while it plays. Move away to pause. To listen from another moment, click the matching spot on the waveform.

Figure: hover to play, with the orange playhead and the filled played part (the default list waveform style). The screenshot shows the Chinese interface.
Right-click menu in the info area
Right-click in the info area on the right of a row (or the agreed area of the row) to tidy and import without entering the editor:
| Icon | Item | What it does |
|---|---|---|
| — | Stars | Rate the sound; starred sounds can be viewed and filtered under Favorites in the top bar |
| — | Color label | Seven colored dots to sort quickly |
| Find similar | Uses this sound to find other sounds that sound alike in a library with features built | |
| Show in folder | Shows the source file in the system file manager | |
| Copy and import | Copies to the project folder set in the top bar and imports into the connected editing app | |
| Transcode and import | Click the target format under the title, transcode, then import | |
| Delete file | Deletes the file from your computer (be careful) |
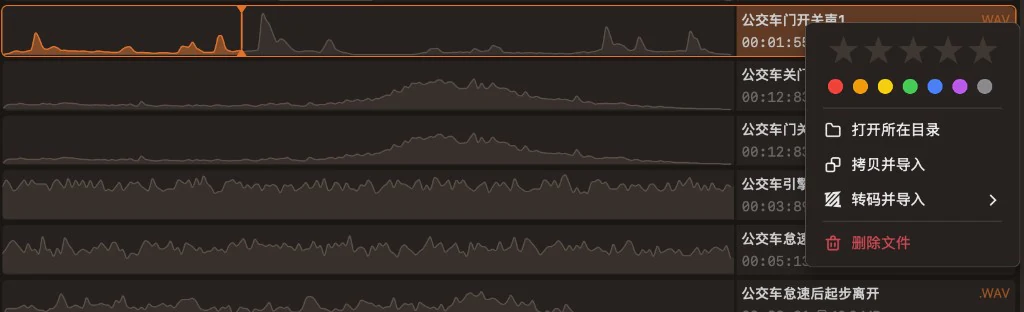
Figure: right-click in the info area with stars, color label, find similar, show in folder, copy / transcode and import, and delete. The screenshot shows the Chinese interface.
Double-click waveform editing (the highlight)
This is the biggest upgrade of the desktop app over the old plug-in: mark the part you want inside LmBox, listen until it is right, then import it to the timeline, instead of dropping a whole long file into the project and trimming it there.
1. Open the editor
In the list, double-click the waveform area of a row (not the info text). The selection editing drawer slides up at the bottom of the main content, loads the waveform and starts playing.
From top to bottom the drawer has:
- Title area: original / translated name (click to copy), source path (click ), and reference info such as size / format / sample rate / channels; a clipping warning may show when the level is too high
- Big waveform canvas: range selection, handles, the selection duration badge (), and playback progress coloring
- Sound / silence preset strip: cut into cells by energy; click one to snap the selection quickly
- Preview bottom bar: speed, reverse, timecode, play / clear selection / import / help
Preview bottom bar buttons
| Icon | Name | What it does |
|---|---|---|
| Speed | Drag the slider to change the preview speed; double-click the icon to reset to 1× | |
| Forward / Reverse | Switches reverse preview; it applies on import as well, with the pitch kept | |
| / | Play / Pause | Preview the selection or the whole track |
| Clear selection | Removes the range and goes back to listening to the whole track | |
| Import to timeline | Writes the current selection into the connected editing app | |
| Drag the selection out | When ready, hold and drag to a folder or any spot in the editing app | |
| Help | Shortcut notes, with a jump to Settings |
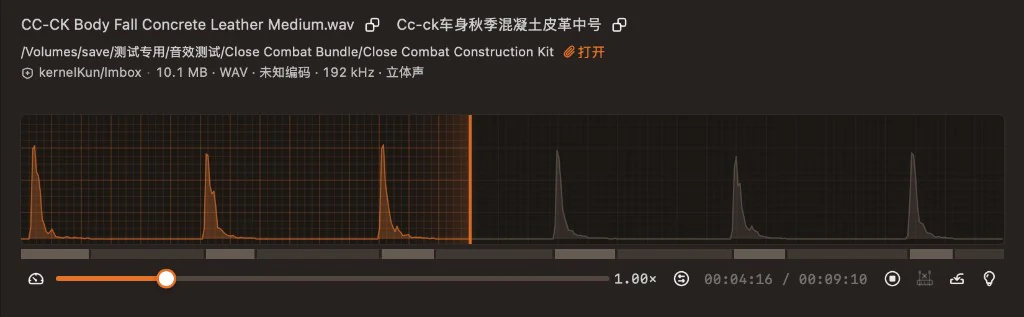
Figure: the selection editing drawer after a waveform double-click, with file info, the big waveform, the preset strip and the preview bottom bar. The screenshot shows the Chinese interface.
2. Drag a range and fine-tune with handles
Press and drag on the big waveform. When you let go, an orange selection appears. Each end of the selection has a vertical handle (an orange bar with a thin slit):
- Drag the left handle: changes the start (trim more of the front or give a bit back)
- Drag the right handle: changes the end (cut the tail or lengthen the decay)
- While you drag a handle, the duration badge changes with it. The preview pauses while you drag, and after you let go it usually plays the new selection once so you can check the cut
Key behaviors (same as the product):
- With a selection: playback loops inside the selection, so you can listen to that hit again and again
- Click inside the selection: jumps to the clicked position
- Outside the selection: a click does not jump around; you can still drag a new selection from outside (the preview pauses while you drag)
- You can also nudge the start and end with shortcuts (see "Shortcuts" below)
The selection also highlights on the list row; for fine adjustment, use the big waveform in the bottom drawer.
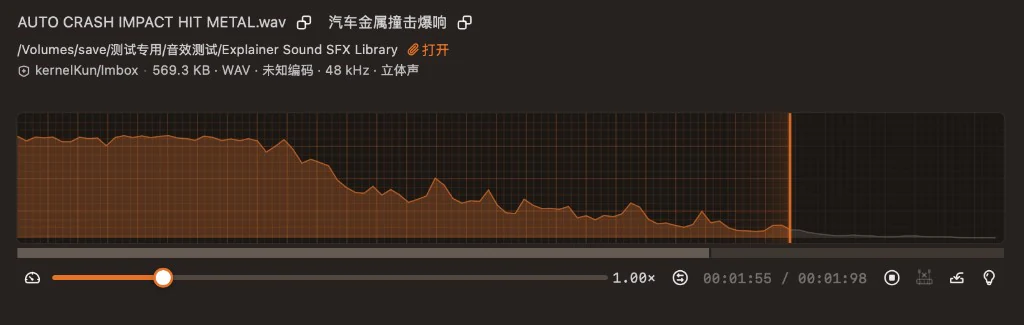
Figure: drag the handles at both ends of the orange selection to pin down the start and end of a hit before importing. The screenshot shows the Chinese interface.
3. Quick pick with preset ranges
Below the waveform a thin strip is cut automatically into cells by "sound / silence" (common in libraries that pack many sounds into one file). Click a cell and the selection snaps to its start and end at once, with handles and the duration badge, which is handy for picking the middle hit from "a row of footsteps / a series of strikes" without dragging from the start.
You can also move between neighboring cells with shortcuts (see "Shortcuts" below; they can be changed in Settings › Keyboard shortcuts).
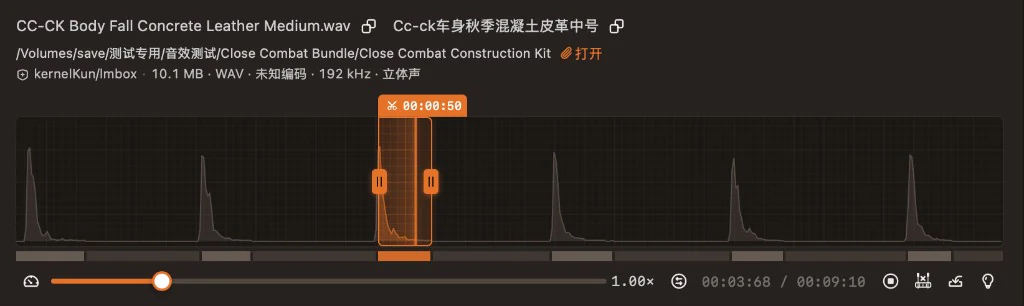
Figure: click a cell on the preset strip and the selection jumps to that sound (the orange cell is the current one). The screenshot shows the Chinese interface.
4. Forward / reverse with pitch kept
The slider on the left of the bottom bar sets the preview speed (shown as 1.00x); double-click to reset to 1×. The button next to it switches between forward and reverse. In reverse the waveform and play direction match, which helps you hear special textures like a "backward hit".
Both preview and import change speed with the pitch kept (only faster or slower, not higher or lower), and it works in forward and reverse.
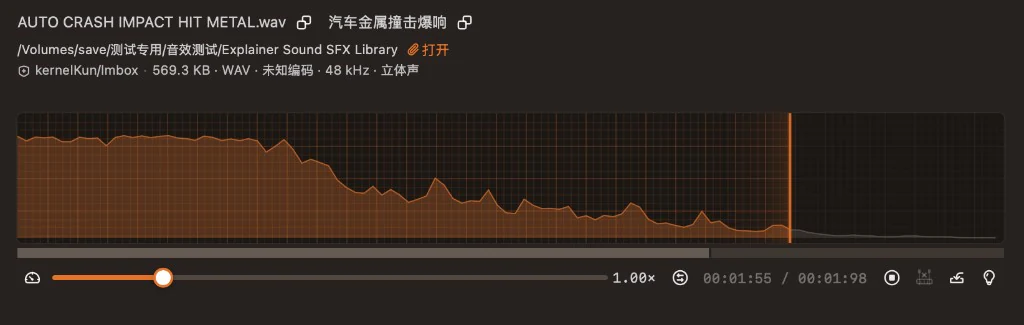
Figure: forward preview: set the speed, mark a range, and loop the selection. The screenshot shows the Chinese interface.
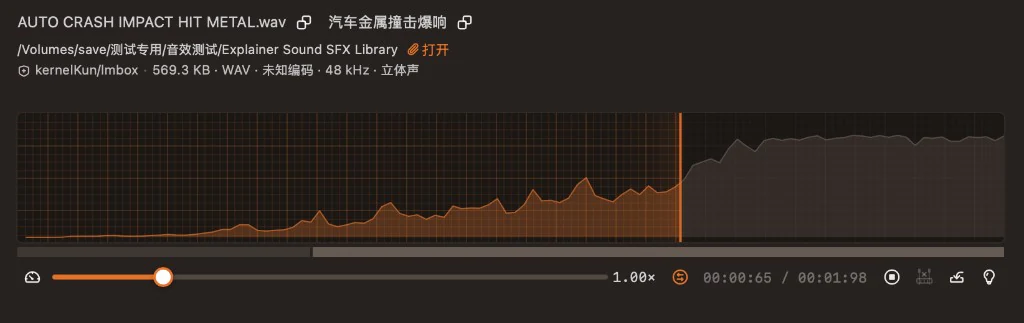
Figure: preview with reverse on; import also bakes in reverse with the pitch kept. The screenshot shows the Chinese interface.
Note
Speed change and reverse preview only support selections of about 2 minutes or less. For longer ones, mark a shorter range first, or import and process in the editing app.
5. Drag the selection out / import into the editing app
Once the selection is marked and ready, you can hold and drag it out (the bottom bar ; when ready it shows "Hold and drag to a folder or editing app"):
- Drop it anywhere on the timeline of the connected editing app
- Or drop it into a folder on your computer to use as a separate audio file
The bottom bar also offers:
| Icon | Action | Description |
|---|---|---|
| Import to timeline | Writes the current selection (with the current speed and forward / reverse) into the connected editing app | |
| Clear selection | Removes the range and goes back to listening to the whole track | |
| Drag the selection out | Hold and drag to a folder or any spot in the editing app |
When you drag out or import, the clip is made with your current forward or reverse + speed, and the pitch is kept, so you do not need to change speed or reverse again in the editing app.
Before importing, check that the target editing extension is selected in the left sidebar and shows as connected.
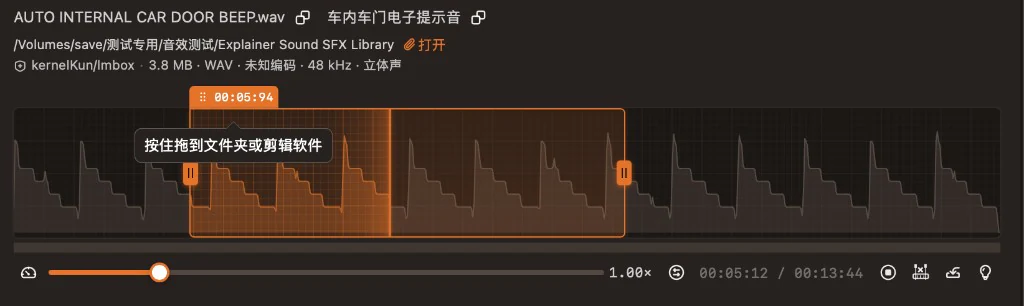
Figure: with the selection ready, hold and drag it out: into a folder, or onto any spot on the timeline of your editing app. The screenshot shows the Chinese interface.
6. Shortcuts (defaults, changeable)
When the editing drawer is open and its content is ready, these shortcuts work inside the app (same as Settings › Keyboard shortcuts; the table shows the factory defaults):
| Action | Default key |
|---|---|
| Play / pause | Space |
| Import selection | W |
| Clear selection | S |
| Slower / faster preview | A / D |
| Toggle reverse | R |
| Seek back / forward | ← / → |
| Previous / next sound-silence preset | Q / E |
| Nudge selection start earlier / later | P / [ |
| Nudge selection end earlier / later | ] / \ |
The button in the drawer also opens the notes and jumps to the shortcut settings.
Name translation
For English sound libraries, turn on Translate sound file names automatically in Settings › Audio & waveform. You can pick the extra translation method:
- Built-in word list (default, offline; you can download the word pack to your computer)
- Large model translation (Official cloud / Golden key / Keychain, and pick a model)
- Cloud translation (sign-in required; uses caps per call)
After you open a folder, translated names and waveforms are processed in the background. Click in the top bar to switch between translated and original name: the list titles and the clip names imported to the timeline change together. For the settings screen see "Audio & waveform settings" below.
Semantic search by features
Click in the top bar to open the dialog. At the top you can switch between three modes:
| Mode | Description |
|---|---|
| By name | Keyword match on the file name / translated name |
| By description | Describe a sound in natural language (such as "a heavy door slam" or "cartoon bounce"). It relies on the search features built on your computer |
| By picture | Drop one or more timeline frames or images to find sounds that match them at once. It relies on the search features built on your computer |
Common controls for search by description:
- Description box: write what the sound you want sounds like
- Golden key / Keychain: pick one when a Chinese description needs to be understood (tied to the model settings)
- Features: shows how many libraries have features built (such as
0/16 libraries); build features for the chosen folders first, or nothing will be found - Search type (by description, by picture): All, Short effects or Long background
- Included folders / Included types: narrow the search
- Search folder depth: how many levels of subfolders to go down (such as depth 5)
Building features runs in the background and you can close the window meanwhile. The top bar and the "Features" in the search box are the same task. While building the button turns red as Stop; click once to stop, and finished work continues next time. When you share the local feature ability with Shot scout and similar tools, avoid building both at once.
Right-click Find similar on the list to find sounds that sound alike to the current one (features must be built first).
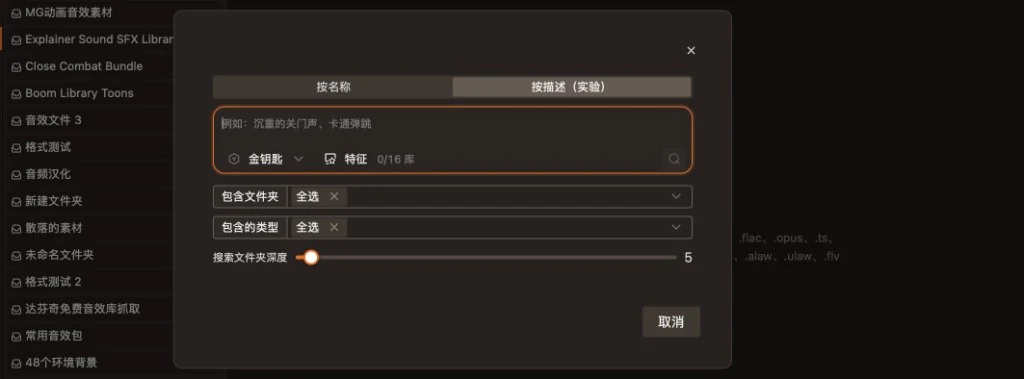
Figure: the search dialog switched to "By description": type a description, check the library progress, and limit folders and depth. The screenshot shows the Chinese interface.
Audio & waveform settings
Find Audio & waveform in LmBox Settings (options save at once). Common items:
| Option | What it does |
|---|---|
| Playback volume | Volume for list and editor previews |
| List waveform style | How the list row waveform looks (see the order below; "Retro" is recommended) |
| Waveform preview | Preview quality (such as "Balanced · recommended"); higher is finer, and the first build takes longer |
| List preview loading | Whole file by default, loaded at once for the current row so click-to-jump feels responsive; switch to segments if your computer lags |
| Waveform generation concurrency | How many waveform tasks run at once, up to 16; lower it if your computer lags |
| Waveform cache count | How many waveforms are cached on your computer |
| Cache expiry | How long until the cache expires (such as 30 minutes) |
| Translate sound file names automatically | When on, list names are translated in the background |
| Extra translation method | Built-in word list / large model / cloud and so on |
| Keychain / model | Pick the Keychain and model when you use large model translation |
The shortcuts for selection editing are set separately in Settings › Keyboard shortcuts.
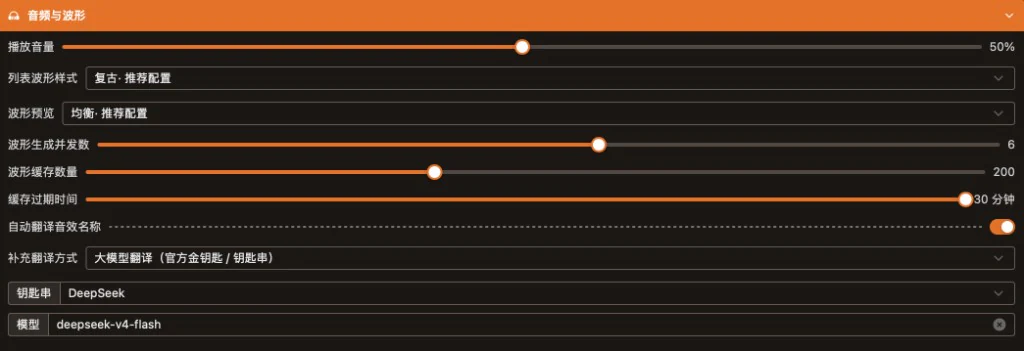
Figure: "Audio & waveform" in Settings with volume, waveform style and quality, cache, and automatic translation with the large model option. The screenshot shows the Chinese interface.
List waveform styles (all options)
The List waveform style dropdown order matches the app (light to heavy; the last one is the oscilloscope). Here is how the same sound looks in each style:
| Order | Name | Look |
|---|---|---|
| 1 | Minimal · High performance | Bottom-aligned fill, lowest cost |
| 2 | Retro · Recommended | Smooth thick-line fill, recommended for daily use |
| 3 | Night line art · Lower | Mostly outline, low fill |
| 4 | Wireframe · Medium | A wireframe, techy look |
| 5 | Mirror · Higher | Mirrored waveform, symmetric top and bottom |
| 6 | Bars · High | Bar-style spectrum |
| 7 | Oscilloscope · Highest | Oscilloscope-style grid + envelope, most detail, highest cost |

1 · Minimal · High performance

2 · Retro · Recommended

3 · Night line art · Lower

4 · Wireframe · Medium

5 · Mirror · Higher

6 · Bars · High

7 · Oscilloscope · Highest
Product note
For daily browsing, the "Retro" style with the "Balanced" waveform preview is enough. The oscilloscope is the finest, but it may use more of your computer's power when the list is very long. If the list says transcoding is needed to show a waveform, go to and use Download and install; details: Configure the transcoding tools.
Recommended flow (in one line)
- Connect the editing extension; set up the transcoding tool if needed
- Add your local sound root folders → open a subfolder
- Hover over the list to listen; double-click the waveform when you need to cut a part
- Drag a range / click a sound cell / drag the handles → when happy, drag it out or import to the timeline
FAQ
Why does double-clicking the file name not open the editor?
Double-click the waveform area on the left. The info area has other uses (import / drag), different from opening the editor.
Why does nothing happen when I click outside the selection?
With a selection, a click outside it is deliberately ignored to avoid wrong jumps. Drag a new selection from outside, or clear the selection first.
The speed preview says the selection is too long?
Shorten the selection to about 2 minutes, or import it and change the speed in the editing app.
The list shows no waveform / says transcoding is needed?
Go to and click Download and install, or check the path. Details: Configure the transcoding tools.
Search by description finds nothing?
First click to build search features for the folders you need. A Chinese description also needs a working Golden key / Keychain and model.
Copy and import failed?
First set a project media folder with in the top bar, and check that the editing extension is connected.
Are "build waveforms / push to home" from the old extension still there?
The desktop app builds waveforms in the background after you open a folder, and the list is ready to use. There is no "push to home" step anymore.
Related features
- Stem split: local stems for dry vocals / backing
- Shot scout: find pictures by description (the same local-features idea as "By description" for sounds)
- Talking rough cut: word-level rough cut written back to the timeline
- Install the desktop app: software install and transcoding tools
- Plug-in manager: extension install and connection
- Demo video · Bilibili
Release notes
2.9.1Right-click "Transcode and import" now lets you click the format right under the title, with AIFF and AAC added, in two aligned rows.2.8.0On import, sounds of 10 seconds or less go to the "Sound effects" folder and longer ones to the "Audio" folder.2.8.0You can now "search by picture": drop one or more timeline frames or images to find sounds that match them at once. Search features must be built first.2.8.0Search by description and by picture can choose a search type: All, Short effects or Long background.2.8.0Right-click "Find similar" uses one sound to find other sounds that sound alike. Search features must be built first.2.8.0The top bar can build search features directly; while building the button turns red as stop, you can stop any time, and finished work continues next time.2.7.0Fixed a new track not being created automatically when importing to the timeline in newer Premiere Pro versions. It now tries to add a track, and tells you to create an audio track first if it cannot.2.3.2Fixed some models not understanding Chinese descriptions in search by description. The matching sounds can now be found.2.3.2In selection editing, dragging a range, dragging a handle or dragging the selection out now pauses the preview.2.3.2Fixed dragging from the list into the editing app sometimes failing. It now drops in reliably. Formats the editing app does not support cannot be dragged in; right-click to transcode first and then import.2.3.2The translated-name switch in the top bar now decides both the list display and the clip names after import.2.2.0Fixed the list scrolling back to the top after a delete and breaking aggregated browsing. It now stays where it was.2.1.4List preview now loads the whole file by default, so jumping is more responsive. You can switch back to segments in Settings to save resources.2.1.4The waveform generation concurrency limit can be raised to 16. Fixed click-to-jump on the waveform not following the click; it now plays from where you click.1.9.2Fixed building features for search by description failing on Mac and finding nothing.1.9.0When building features finishes, you can get a system notification and a push alert with the result.1.7.3Faster "By description" search for sounds.1.6.0The sound library adds "By description" search (experimental): describe the sound in a sentence to find it. A Chinese description is first understood by the chosen model, then searched.1.6.0Sound "By description" and name understanding can use "Official cloud / Golden key", so you do not need your own model key.0.2.7Sound library supports more audio formats. Common lossless, surround and audio tracks in video containers can be imported, shown as waveforms and previewed.0.2.1Sound management: the top bar can switch the list between translated and original names, and the setting is remembered.