
Name Translate


"Name Translate" in LmBox lets you build your own source / translation pairs for the various interface names in DaVinci Resolve, Premiere and After Effects, then inject a language pack and switch the display inside the app. In DaVinci Resolve you can also switch to Fusion comps to translate nodes and text. The sidebar icon is .
What you will learn
- Open Name Translate from the sidebar, and switch between "UI names / Fusion comps" in DaVinci Resolve
- Dictionaries: use, create, import, export and merge-import
- Inject language pack and Capture names into a dictionary
- Add entries manually: one by one or in bulk, and copy the AI prompt
- Sync translations back to the interface, and get / import on the Fusion comps side
Guide
This is the Lab guide (main document) for the LmBox desktop app. The former "Fusion Translate" sidebar item is merged into this page; for old wording and overview anchors, follow this page.
What it does
| Capability | Description |
|---|---|
| UI names | Write translations for English UI names in Fairlight, the effects library and more; after injecting a language pack you can switch between source and translation |
| Dictionaries | Several dictionaries grouped by app; use, create, import, export and merge import |
| Capture | Open or scroll the relevant UI; names go into the word pool and can be ticked and written into the dictionary |
| Manual add | Add one entry, or paste many as "source | translation"; Copy AI prompt lets you hand a UI screenshot to any agent and get the right format back |
| Fusion comps (DaVinci Resolve only) | Load node text from the timeline or a .setting file, translate it, and import it back to the comp |
Before you start
- Install and open the LmBox desktop app, and connect the matching editing extension in Settings
- Pick the target editing app in the sidebar ( / / ) and make sure the extension icon is lit
- If you use cloud / official assisted translation, sign in first and confirm you have quota
The screen
Open from the sidebar. In DaVinci Resolve the top bar switches between UI names and Fusion comps; Premiere / After Effects only offer UI names.
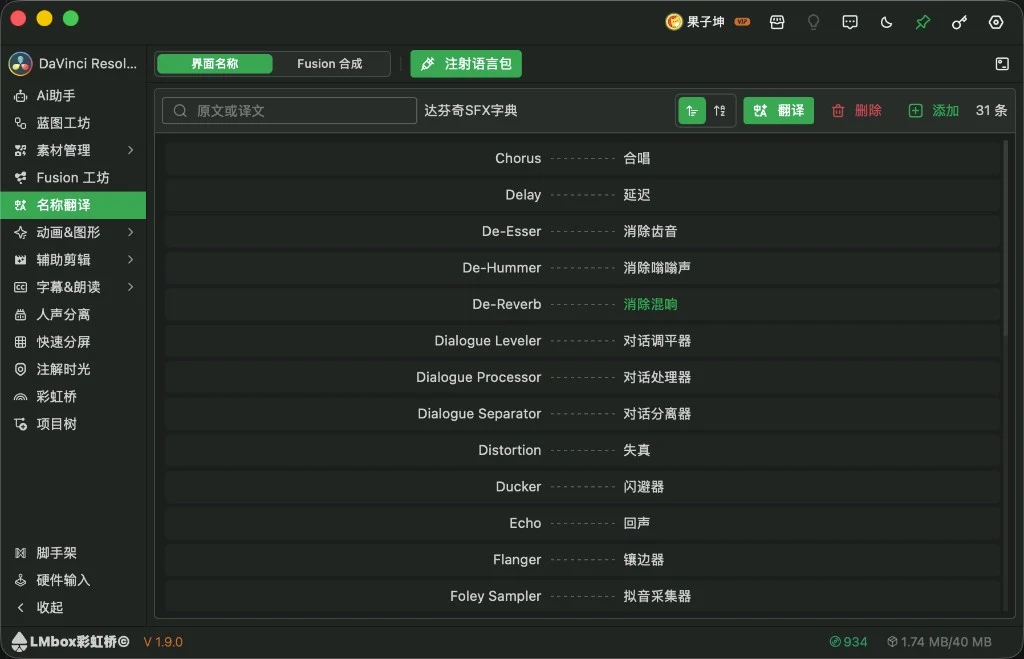
Figure: Name Translate: the UI names tab, inject language pack, and the dictionary entry list. The screenshot shows the Chinese interface.
Screen areas
| Area | What it does |
|---|---|
| in the sidebar | Opens this page |
| UI names / Fusion comps (DaVinci Resolve) | Switch between the two workspaces |
| Inject a language pack into the current app; only then can the display sync | |
| Capture | Arm it, then open or scroll the UI so names go into the word pool |
| Sync | Push the current dictionary translations to the UI that has the language pack |
| Dictionaries | Create / use / import / export dictionaries |
| Search and sort | Filter by source or translation; sort by added time or A–Z |
| Assist translate / Delete / Add | Fill empty rows, bulk edit or delete, add entries |
| Entry list | Two columns, source and translation; right-click to edit, copy, sync or delete |
Steps (UI names)
1. Dictionaries (use / import / export / merge)
Click in the top bar to open the Dictionaries drawer on the right. The list is grouped by After Effects / Premiere / DaVinci, each dictionary shows its entry count, and the one in use is highlighted (for example the DaVinci SFX dictionary).
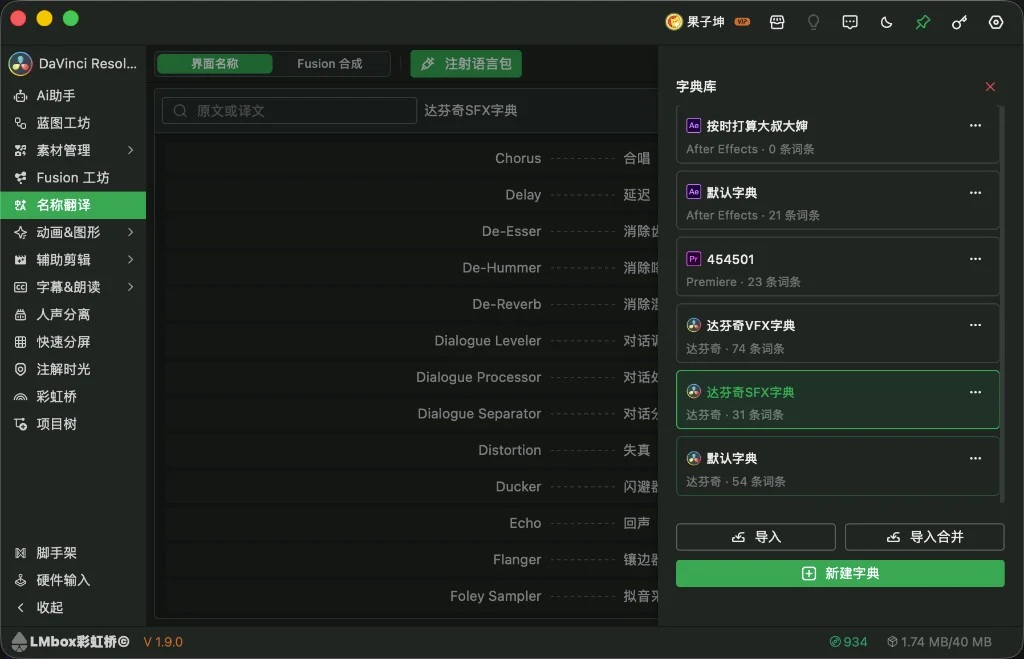
Figure: Dictionaries: manage dictionaries grouped by app; import, merge import and new are at the bottom. The screenshot shows the Chinese interface.
| Action | Description |
|---|---|
| Use | Click a dictionary and the main list switches to its entries |
| New dictionary | The green button at the bottom creates an empty dictionary for the current app |
| Import | Import a dictionary pack file as a new dictionary (and optionally use it) |
| Merge import | Merge the entries from a dictionary pack into the dictionary in use (same app only) |
| Export | In the ⋯ menu of a dictionary row; handy for backup or sharing |
| Rename / Delete | Also in the ⋯ menu |
Injecting a language pack loads all the UI dictionaries of the current app at once, so you do not have to switch one by one. To change app, pick the matching extension in the sidebar first, then use a dictionary under that app.
2. Inject the language pack
Before capturing and syncing, inject a language pack first:
- Click
- Wait for the progress to finish (a message says it was injected)
After a successful injection, icons for Capture and Sync appear in the top bar. If the editing app is closed or the connection drops, inject the language pack again.
3. Capture (collect source names from the UI)
Good for collecting, in bulk, the English names already showing in panels such as the effects library or Fairlight, then writing them into the current dictionary.
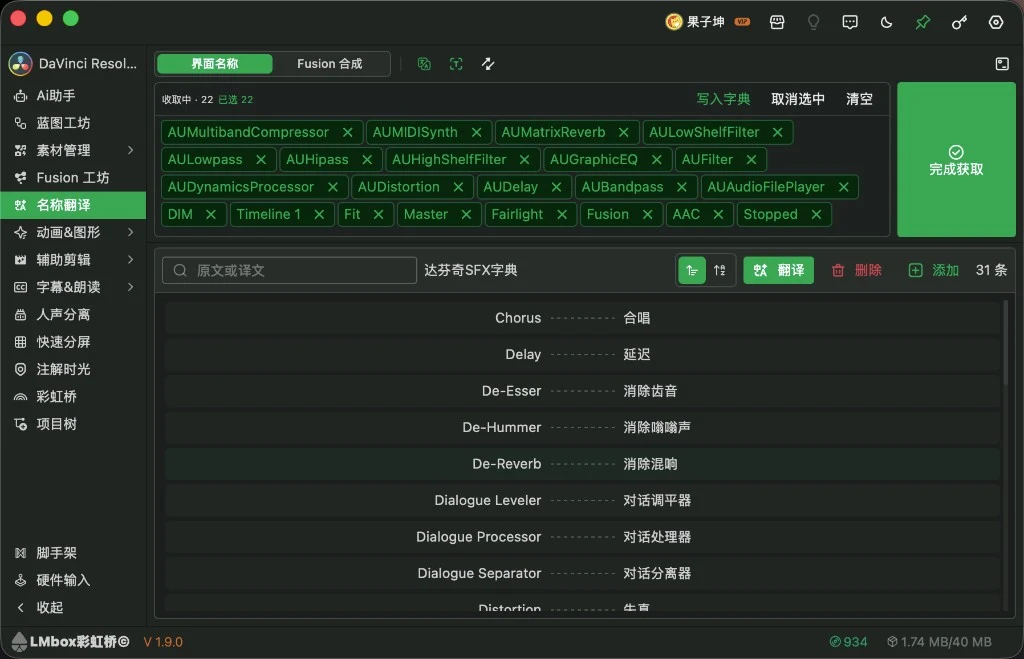
Figure: Capture in progress: the word pool shows collected names, which you can tick and write into the dictionary or finish with "Done". The screenshot shows the Chinese interface.
Steps:
- Make sure the tab is UI names and a dictionary is in use (for example the DaVinci SFX dictionary)
- Click Scan names in the top bar to enter capturing (the status bar shows "Capturing · n")
- In the editing app open or scroll the target panel (effects library, mixer and so on); names that appear go into the word pool above one by one (green tags)
- Tidy up in the word pool:
- Click a tag to tick / untick it; use Deselect and Clear
- Remove unwanted tags with the close button on the tag
- Write the selected items into the dictionary in one of two ways:
- Add to dictionary: writes the current selection right away and you can keep capturing
- Done: ends this scan; if something is ticked it writes the selection, otherwise it writes everything in the pool
Source names already in the dictionary are not written twice. After capturing you can use Assist translate below to fill empty translations in bulk, or Add in the next section to add entries by hand.
4. Add entries manually (with the AI prompt)
Click Add in the list toolbar to open the Add entry dialog.
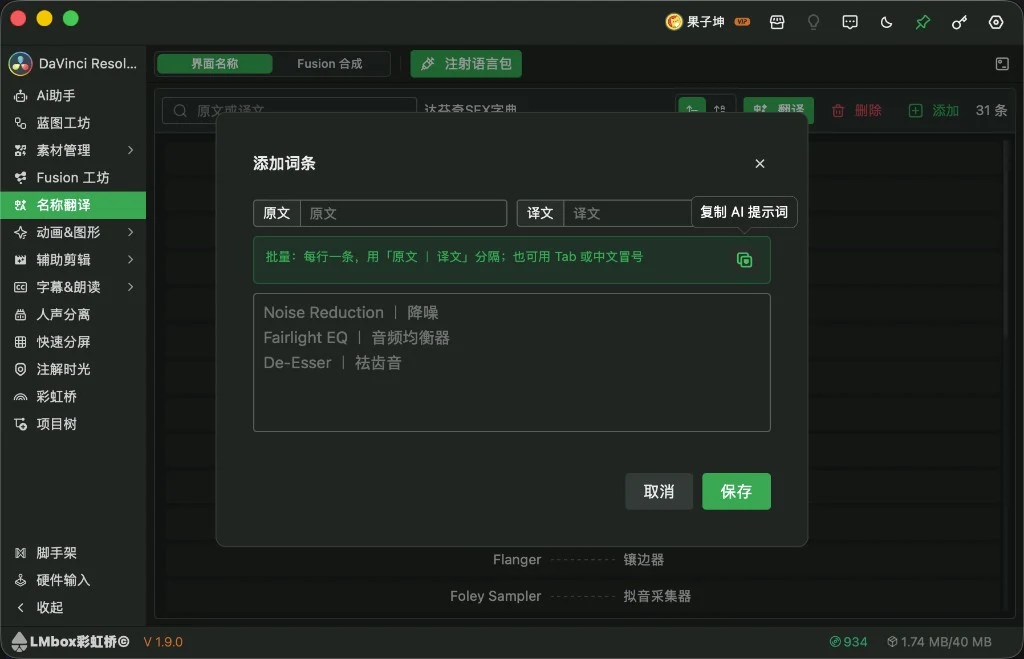
Figure: Add entry: fill in one entry, or paste many as "source | translation"; you can copy the AI prompt. The screenshot shows the Chinese interface.
Format:
| Way | Description |
|---|---|
| One entry | Fill in Source and Translation at the top, then save |
| Bulk | One entry per line in the box below, separated by the full-width vertical bar | (Tab or the full-width colon : also work) |
Example (translation into a target language of your choice; the example uses Spanish):
Noise Reduction | Reducción de ruido
Fairlight EQ | Ecualizador de Fairlight
De-Esser | Eliminador de sibilancias
Use an agent to produce the format in bulk:
- Click Copy AI prompt (the content is shown below, the same as in the app)
- Paste the prompt into any chat agent and attach a screenshot of the editing app's interface or a list of English names
- The agent returns several lines of "English | translation" as instructed
- Paste the whole result into the bulk box and click Save
The prompt as copied in the app (the English app build targets Simplified Chinese; if you want another target language, change that one phrase before you paste it):
Translate the editing-app UI English names below into Simplified Chinese. Output only the result, no explanations.
Format: one pair per line as English | Chinese, using a full-width vertical bar | with optional spaces. No numbering, quotes, or Markdown.
Example:
Noise Reduction | Denoise
Fairlight EQ | Fairlight EQ

List or image to translate:
You do not need to depend on the "Assist translate" button on this page; the prompt fixes the format, so any chat agent works.
5. Show translations
- When needed, click Sync to UI
- Or use the language icon in the top bar to switch between Show original / Show translated
Fusion comps (DaVinci Resolve)
After you switch to Fusion comps in DaVinci Resolve, you are in the former "Fusion Translate" workspace: get node text, translate controls / text, then import back to the comp.
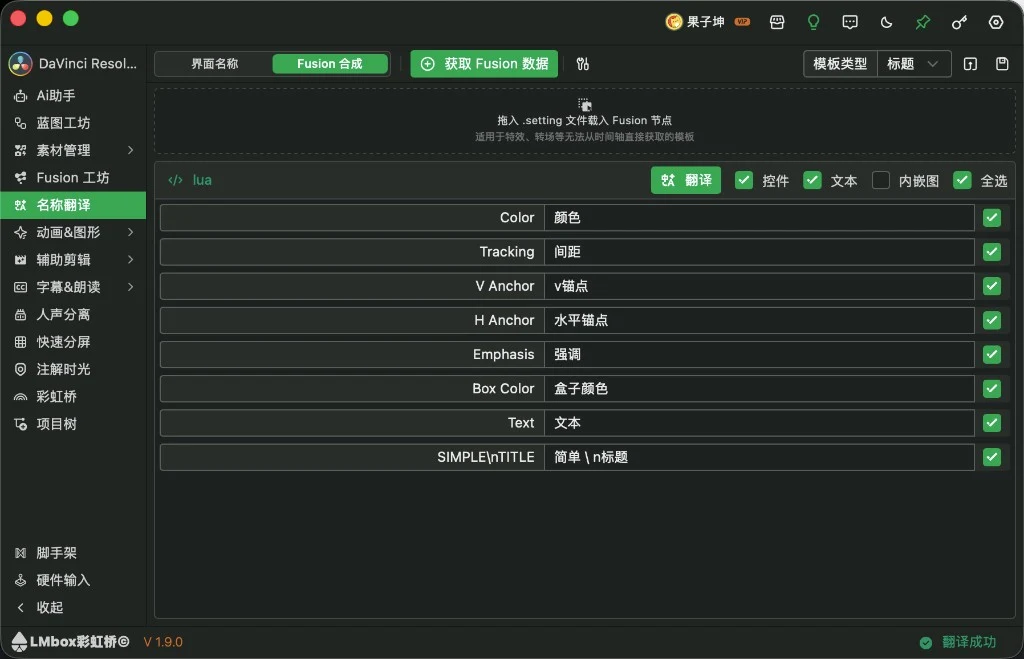
Figure: Fusion comps: get data, drop in a .setting, translation list and template type. The screenshot shows the Chinese interface.
Key points of the screen
| Area | What it does |
|---|---|
| Get Fusion data | Get titles / generators from the timeline, or paste nodes |
| Drop zone | Drop in a .setting to load effects, transitions and other nodes that cannot be fetched from the timeline directly |
| Controls / Text / Embedded images | Filter what the list shows; embedded images are inspector diagrams, not translated, and can be previewed and replaced separately |
| Translate | Pick a route and language, then fill translations in bulk, or edit each row by hand; the route and language are remembered |
</> lua | Switch between the translation list and the script preview |
| Template type | Choose the type before importing (for example title) so it is written back to DaVinci Resolve correctly |
| Import / Save | Import the translations back to the comp, or save them on this computer |
Steps
- Open from the sidebar and switch to Fusion comps
- Click Get Fusion data, or drop a
.settinginto the dashed area - Tick the Controls and Text you want to translate (turn on Embedded images if needed)
- Click Translate, or edit the translations row by row
- Pick the Template type, then Import back to the comp; Save if needed
Translating the controls of a single local preset can also be done in the Fusion Presets drawer, which complements this page.
FAQ
Q: Where did the old "Fusion Translate" go?
A: It is merged into Name Translate in the sidebar. In DaVinci Resolve, open this page and switch to Fusion comps to keep translating node text.
Q: Nothing changed in the interface after injecting a language pack?
A: Make sure the extension is connected, a dictionary is in use and has translations, then click Sync; inject the language pack again if needed. After you close the editing app you need to inject it again.
Q: Capture stays empty?
A: Arm Capture first, then open or scroll the relevant panel; for both Adobe apps and DaVinci Resolve the names only enter the pool once they actually show in the interface.
Q: Can I merge a dictionary from another app?
A: No. Merge import only accepts dictionary packs for the same app as the dictionary in use; across apps, import them as new dictionaries and use each separately.
Q: What is the difference between Import and Merge import?
A: Import adds a new dictionary; Merge import merges entries into the current one, which suits filling gaps or merging entries shared by a teammate.
Q: How is this different from "Translation replace"?
A: Translation replace is more about replacing text inside footage / projects; this page focuses on host interface names and DaVinci Resolve Fusion comp text.
Further reading
- Lab features overview
- Fusion Presets: translate and manage a single preset
- Fusion Lab
- LmBox desktop install
- Desktop release notes (Chinese only for now)
Video tutorial
Release notes
2.4.1Translation remembers the route and language you chose last time and reuses them on the next open.1.9.1Dictionaries support "Merge import": entries from a dictionary pack can be merged into the dictionary in use (same app only).1.9.1Injecting a language pack loads all the UI dictionaries of the current app at once, so you no longer switch one by one.1.9.0Added "Name Translate": build your own pairs for DaVinci Resolve, Premiere and After Effects interface names and switch the display.1.9.0The former "Fusion Translate" is merged into "Name Translate"; DaVinci Resolve Fusion text and interface names are managed on one page.1.8.0Rebuilt the top bar of the former Fusion Translate (get data, translate, settings and tool pop-ups); supports dropping in a.setting, switching between the translation list and script preview, and filtering out and replacing inspector embedded images.1.2.1Fixed copying an expression still copying the untranslated source; you can choose the template type before importing so it is written back to DaVinci Resolve correctly.0.2.1When translating you can tick "Text" or "Controls"; both are listed and translated by default.