
Trim silence


"Trim silence" in LmBox marks pauses automatically from the baseline track waveform, then writes the kept parts back to the connected editing app. The desktop app supports many tracks and many clips: tick the tracks that take part, and the result goes back to each source track. The sidebar icon is .
Video tutorial
What you will learn
- Get timeline clips, choose the baseline track, and tune the silence and offset settings
- Tick several tracks, read track labels (such as
V1·A1), and know the write-back rules - Use each icon button on the waveform toolbar
- New timeline / Keep gaps / Add marker, and export timeline audio
Guide
This is the main Lab guide for the LmBox desktop app. Screenshots on this page show the Chinese interface. You can switch the app to English in Settings. If you want to cut repeats, mark highlights or use AI on a word-level transcript, use Talking rough cut.
What it solves
| Pain point | What this page does |
|---|---|
| Too many pauses in a talking video, and cutting by hand is slow | Marks keep / filter segments from the waveform, then writes them back in one click |
| Multi-camera or multi-track pauses must line up | Tick the tracks that take part in the track list. You can cut only some tracks |
| Picture and sound tracks must return together | Track labels show the V·A link. Each part goes back to its own source track |
| You want a tight edit, or you want to keep the time positions | Choose New timeline or Keep gaps |
Before you start
- Pick the target editing app in the sidebar (Premiere Pro / DaVinci Resolve). Its plug-in icon should be lit.
- Put the talking-head clips to process on the timeline (several tracks are fine).
- To export a mix, set up the external tools first (see Install the desktop app).
The desktop screen
Open from the sidebar. From top to bottom: get clips and track list → waveform preview and toolbar → settings → write-back options and Start editing.
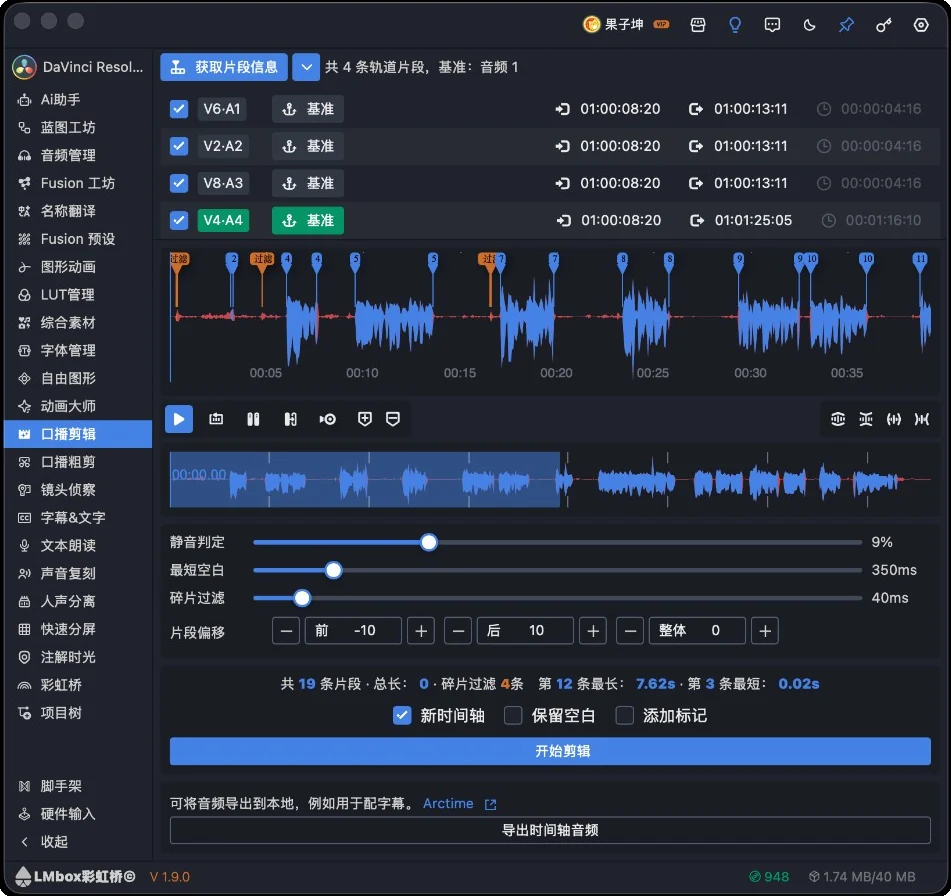
Figure: the track list, the baseline waveform, the setting sliders and "Start editing". The screenshot shows the Chinese interface.
Screen areas
| Area | What it does |
|---|---|
| Reads the relevant audio track clips from the timeline | |
| Track list (expandable) | Tick which tracks take part, set the baseline, and see in/out points and duration |
| Waveform preview | The baseline waveform. You can also drop local audio/video to preview and tune. When you start editing, the media is imported into the media pool and written to a new timeline. Compare kept parts with the filter marks |
| Play and zoom toolbar | Listen, loop, sync, markers, waveform height and horizontal zoom |
| Settings | Silence threshold, min. silence gap, tiny fragment filter, clip offset |
| Write-back options + | New timeline / Keep gaps / Add marker, then write back |
| Export timeline audio | Exports the current timeline mix to a folder on your computer |
How to use many tracks and clips
- Click Get clip information. It lists the track clips on the timeline (there can be several).
- Tick the tracks that take part. Tracks you do not tick stay as they are when you write back.
- Track labels: with a linked picture track you see for example
V6·A1; audio only showsA1. - Click on one track: its audio is exported and used for the waveform (by default the shorter track can be the baseline).
- Tune the settings and watch the keep / filter parts on the waveform. When you are happy, pick the write-back options and click Start editing.
Write-back rules (desktop):
- Ticked tracks go back to their own source tracks, picture and sound. Several tracks are never squeezed into one.
- If New timeline and Keep gaps are both off, the original clips on the chosen tracks are deleted. You get a red confirmation before it starts.
- With New timeline on: a new timeline is created in the target app and the clips are placed there.
- With Keep gaps on: clips stay at their original time positions, so you can sort them by marker color.
- With Add marker on: markers are added when you write back.
You can also tick one track at a time and click Start editing several times, one step at a time.
Waveform toolbar (icon buttons)
| Icon | Name | What it does |
|---|---|---|
| / | Play / Pause | Listen to the baseline audio |
| Loop | Loops the whole clip | |
| Loop one region | Loops inside the current region | |
| Play regions in order | Plays the regions one after another | |
| Sync preview | Sets the timeline in/out points. Press play in your editing app | |
| Add marker | Adds a point on the waveform | |
| Remove marker | Removes a waveform marker | |
| / | Taller / Shorter waveform | Changes the waveform height |
| / | Zoom in / out (time) | Changes the horizontal time scale |
Time buttons on the right of the track list:
| Icon | What it does |
|---|---|
| + timecode | Jumps to this track's in point |
| + timecode | Jumps to this track's out point |
| + timecode | Shows the duration (read only) |
Settings
| Setting | What it does |
|---|---|
| Silence threshold | Parts quieter than this level count as silence (compare on the waveform). Default 10% |
| Min. silence gap | How long a silence must be before it is marked as a pause to remove. Default 200 ms |
| Tiny fragment filter | Drops very short sounds that are kept (such as clicks). Default 40 ms |
| Clip offset · Before / After / Overall | Adds or subtracts milliseconds at the in and out points of kept parts, or shifts everything. Default: before -40 ms, after 70 ms, overall 0 |
The summary below shows the number of regions, the total length, the number of filtered fragments, and the longest and shortest region.
Steps
- Connect the plug-in and open
- Get clip information → expand the track list, tick the tracks, choose the baseline
- Tune the silence threshold, gap, fragment filter and offset. Watch the waveform
- Tick New timeline / Keep gaps / Add marker as you need
- Click Start editing. If it warns that original clips will be deleted, confirm to continue
- When needed, click Export timeline audio to save the mix on your computer (for example for subtitles)
FAQ
Q: How is this different from Talking rough cut?
A: This page cuts tracks by waveform pauses. Talking rough cut works on a word-level transcript: keep or cut lines, highlights and AI rough cuts.
Q: After a multi-track write-back, picture or sound ended up on one track?
A: Use the current desktop version. Each part should go back to its own source track. If it still looks wrong, check that the plug-in is connected and the tracks are ticked correctly.
Q: I clicked Start editing without New timeline?
A: A tight write-back deletes the original clips on the chosen tracks, and this cannot be undone. Read the red confirmation first, or tick New timeline / Keep gaps instead.
Q: Sync preview does not play by itself?
A: It jumps to the position and sets the in/out points. Press play in your editing app.
Q: Do I need to get clip information before exporting timeline audio?
A: No. You can export the current timeline mix straight to the folder you choose.
Further reading
- Lab features overview
- Talking rough cut: word-level transcript rough cut
- Install the desktop app
Release notes
2.1.2Trim silence supports sync preview: both Premiere Pro and DaVinci Resolve set the in/out points, then you press play in the app.2.1.2New defaults: silence threshold 10%, clip offset before -40 ms and after 70 ms, tiny fragment filter 40 ms.2.1.2Fixed "Loop one region" and "Play regions in order" not working. You can now loop or play regions in order.2.1.1Fixed a problem where audio could not be taken from a track after a transition was added in DaVinci Resolve. Trimming now works.2.0.0You can drop local audio/video on the waveform area to preview and tune. When you start editing, the media goes into the media pool and a new timeline is written.1.8.1Fixed writing to DaVinci Resolve giving sound but no picture. Video and audio are now both placed.1.8.1Fixed a wrong deletion of sound and a crash when writing back to the current timeline. Placement works now, and with Keep gaps it avoids existing tracks.1.8.1Fixed a roughly one-hour offset in DaVinci Resolve caused by a custom timeline start being added twice.1.8.1Fixed multi-track write-back to DaVinci Resolve squeezing several video tracks into one. Each part now goes to its own picture and sound track.1.8.1Fixed multi-track write-back to Premiere Pro squeezing several tracks into one video track. Each part now returns to its source track.1.8.1Fixed a tight write-back moving clips to other tracks because of a wrong overlap check. Clips are now placed one after another on their own track.1.8.1You can tick which tracks take part: process only the chosen tracks, write back to the source tracks, leave unticked tracks alone, or cut one track at a time.1.8.1The track list shows linked picture and sound tracks (such asV1·A1). Audio-only tracks still show asA1.1.8.1Without New timeline, a tight write-back now asks for confirmation in red text before Start editing: the original clips on the chosen tracks will be deleted.0.2.4Fixed "Export timeline audio" needing clip information first, or saying there was no valid selection. You can now pick a folder and export the current timeline mix.