
Talking rough cut


"Talking rough cut" in LmBox (also called smart rough cut inside the app) does a word-level rough cut of talking-head video on the desktop. It turns speech into a word transcript. Then you mark cuts and highlights with rules, by hand, or by asking the AI in plain language. The kept parts are applied to DaVinci Resolve and Premiere Pro. The sidebar icon is . It has been improved a lot since 1.8.
What you will learn
- What each area and toolbar icon does
- Import / recognize → rules and manual marks → AI rough cut → apply to the timeline
- Retake badges, silence trimming, filler wipe and transcript round trips
- How it differs from "Trim silence"
Guide
This is the main Lab guide for this tool. Screenshots on this page show the Chinese interface. You can switch the app to English in Settings.
The desktop screen
Open from the sidebar group "Edit assist". The transcript is on the left (shown line by line; you can mark words). The panel is on the right (segment list, video preview, waveform). The top bar has the entry points: get from timeline, recognition channel, pens, rules and AI.
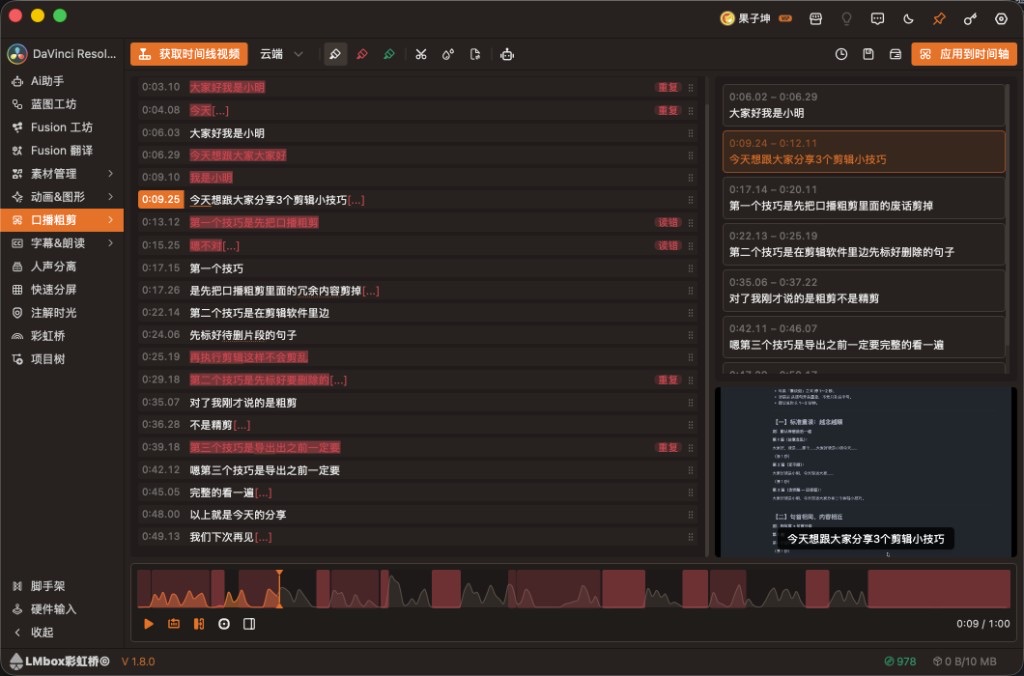
Figure: Talking rough cut on desktop: transcript, panel segments and preview, and the rough-cut areas on the waveform. The screenshot shows the Chinese interface.
Top bar tools (icon guide)
| Icon | Name | What it does |
|---|---|---|
| From timeline (video) | Gets the current timeline media from connected DaVinci Resolve / Premiere Pro | |
| — | Recognition channel | Choose Local or Cloud speech recognition |
| Default pen | Clears marks and rule cuts (neutral pen) | |
| Red pen | Marks a cut (matches the rough-cut area on the waveform) | |
| Green pen | Marks a highlight to keep | |
| Rough-cut rules | Panel for silence trim, retakes and other rules | |
| Filler wipe | Opens text cleanup (filler words, sensitive words, find and replace) | |
| Script export and import | Export or import the script, so you can proofread it elsewhere and write it back | |
| AI trim input | Opens the plain-language input bar at the bottom | |
| History | View and restore earlier versions | |
| Save project | Saves the current rough-cut project | |
| Saved projects | Opens the project library | |
| Apply to timeline | Writes the kept segments back to your editing app |
If the feature is not unlocked, you may see next to the apply button. As with "Trim silence", you can open the page freely. The check happens when you apply to the timeline.
Screen areas
| Area | What it does |
|---|---|
| Transcript (left) | Recognized lines and words. A red background usually means lines to trim (such as repeats and retakes). You can drag lines to reorder them and click a timestamp to jump. Click [...] between lines to keep or trim that silence |
| Segments (right) | Lists the segments that will be written to the timeline (time + text). Click one to jump to it |
| Video preview (right) | Previews the media. When empty you can . Subtitle lines can show over the video while it plays |
| Waveform | Shows volume and the rough-cut areas. Dock it full width, or show it inside the panel again |
Before you start
- Install and open the LmBox desktop app (1.8 or newer is recommended)
- Open DaVinci Resolve or Premiere Pro and check that the editing plug-in is connected (getting from the timeline and applying both need it online)
- In the sidebar group "Edit assist", open
- Click From timeline (video), or drop a local video onto the preview area
- Pick a recognition channel and wait until recognition finishes and word cards appear in the transcript
Note
For local recognition, set up a model in Settings first. Cloud recognition uses credits. Silent media cannot be recognized. Before you apply to the timeline, make sure there are segments to keep.
Suggested workflow
1. Import and recognize
- From timeline (video): pulls the clip under the playhead (or the timeline video) into this page
- Drop video: drop one video or audio file on the panel
- After recognition, the transcript shows timestamps and lines. The panel lists the kept segments and the waveform shows the rough-cut areas
Remember the steps: Import → Analyze → Review → Apply.
2. Rough-cut rules (scissors)
Open . You can set:
| Section | What it does |
|---|---|
| Silence trim | Shortens pauses between lines and blanks at the head and tail. You can adjust the line pause, head and tail cushion, gap shift and the size of narrow gaps to skip |
| Retakes | When you read a line several times, finds the retakes by similarity and timing. The transcript can show badges such as "wrong", "dup" and "retake". Click a badge to toggle whether that take is trimmed |
After the rules run, you can still adjust with the red and green pens or the AI. Click "Regenerate marks" to refresh the marks with the current rules.
3. Mark by hand
- Red pen: select words or lines to cut
- Green pen: mark highlights to keep
- Default pen: clears marks and rule cuts
- Silence marker
[...]between lines: click to switch between trim and keep
4. Filler wipe and text cleanup
Open . It cleans filler words and (optionally) sensitive words, and runs find and replace or text rules. Cleanup mainly affects how the transcript is shown and corrected. The panel segments are still built from the kept-timeline logic.
5. AI rough cut in plain language
Click and describe what you want in the bottom bar. Recognition must be finished, and you must choose official cloud or a Keychain model. Long scripts are analyzed in parts. You can watch progress in the "AI analysis" drawer, and stop it at any time.
Here are some directions for your request. The box takes free text; these are not one-click buttons:
| Direction | What to say |
|---|---|
| Tighten | Remove repeats, drag and filler lines. Say what topics must stay |
| Highlights | Mark key quotes or main points. You can limit the count |
| Key points | Keep only steps and conclusions. Examples and transitions can go |
| Proofread | Fix typos, unify brand names, skip swear words, merge wrongly split lines |
6. Script export and import
exports the script for editing elsewhere, then imports it back. Use a file exported by this app, and import it in the same project.7. Apply to the timeline
When the segments look right, click . The kept segments are written to the connected DaVinci Resolve or Premiere Pro. Before you apply, you can restore an earlier version of the marks from History.
How it differs from "Trim silence"
| Item | Talking rough cut | Trim silence |
|---|---|---|
| Based on | Word-level transcript + rules / AI / manual | Silence detection on the audio waveform |
| Good at | Retakes, repeated lines, highlights, proofreading | Batch pause removal, tighter talking pace |
| Review | Read lines and badges, edit in the transcript | Check the red and green areas on the waveform |
Both work with DaVinci Resolve and Premiere Pro. Pick by media type, or use them one after the other.
FAQ
Q: What is Talking rough cut?
A: A word-level tool in "Edit assist". It recognizes speech into a transcript, marks cuts and highlights, then applies the result to the timeline. Rules and AI have kept improving since 1.8.
Q: How do I use it with DaVinci Resolve / Premiere Pro?
A: Plug-in online → open Talking rough cut → get from the timeline or drop a video → recognize → rules / manual / AI → apply to timeline.
Q: What are the "dup" and "wrong" badges?
A: Hints from the retake rules. Click a badge to switch whether that take is trimmed.
Q: Local or cloud recognition?
A: Local needs a model you set up. Cloud uses the official channel or one you configured. If recognition fails, check the model and credits, or try other media.
Q: Will the AI change my timeline directly?
A: No. The AI only updates the marks in the transcript. Nothing is written to your editing app until you click "Apply to timeline".
Q: What are the limits?
A: It depends on recognition quality. Getting from the timeline and applying need the plug-in online. It does not replace fine cutting, color or graphics. For very short lines or lines you repeat on purpose, use the protect words in the rules to avoid wrong cuts.
Further reading
- Lab features overview
- Trim silence: remove pauses by waveform, also for talking-head video
- Shot scout: find shots by description, also in "Edit assist"
- Install the desktop app
Video tutorial
The steps on this page come first.
Release notes
2.9.0The page opens your last used project automatically.2.1.1Fixed a problem where audio could not be taken from a track after a transition was added in DaVinci Resolve. Rough cuts now work.1.7.3Improved media handling so longer videos run more smoothly.1.6.0You can choose "official cloud / golden key" for the official line, so you do not need your own model key.1.4.8Silence trim in the rough-cut rules is now a switch. It is off by default. Turn it on to mark line pauses and head/tail blanks automatically.1.3.2AI rough cut is stronger. It reads your highlighter marks for cuts and highlights, and keeps your hand marks over several rounds of requests. Long talks are analyzed in parts and failed parts are retried automatically.1.3.2Fixed an occasional jump on screen when the AI analysis drawer opened.1.3.2While the AI works, you can open a step panel at the bottom to see part progress, merge and write progress, and the time of each step.1.2.1New: after you recognize a talking video, you can mark words in the transcript, drag handles to reorder lines (multi-select to move as a group), and apply the result to the editing plug-in timeline.