
Split view


"Split view" in LmBox designs and maps split screens on the desktop. Drag panes in the preview, bind clips from parallel tracks on your timeline to each pane, then write the crop and transform into DaVinci Resolve or Premiere Pro in one click. The screen and steps are the same for DaVinci Resolve and Premiere Pro, and presets work across both apps.
Video tutorial
Public class demo: Open on Bilibili
What you will learn
- What each area of the desktop screen does
- Get info/clips → design panes → Apply to edit / Import empty comps
- Right-click a pane: change the layout, set a cutout
- Select a pane, then use zoom and five-way pan in the Properties panel
- Presets, random fill, and the difference between Premiere Pro and DaVinci Resolve
- How to fix a wrong aspect ratio
The desktop screen
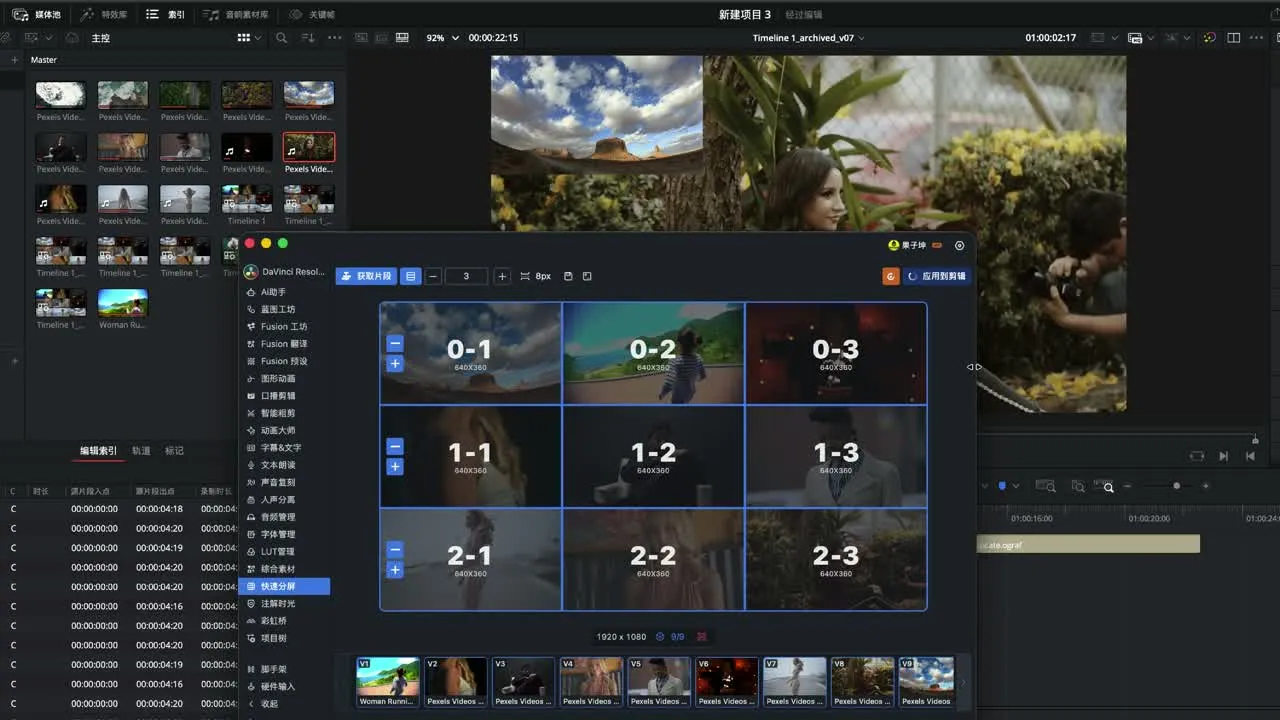
This is the Split view page of the LmBox desktop app. On the left is the feature nav. In the middle are the split preview and pane editing. At the bottom is the strip of fetched clips. The top bar has , and .
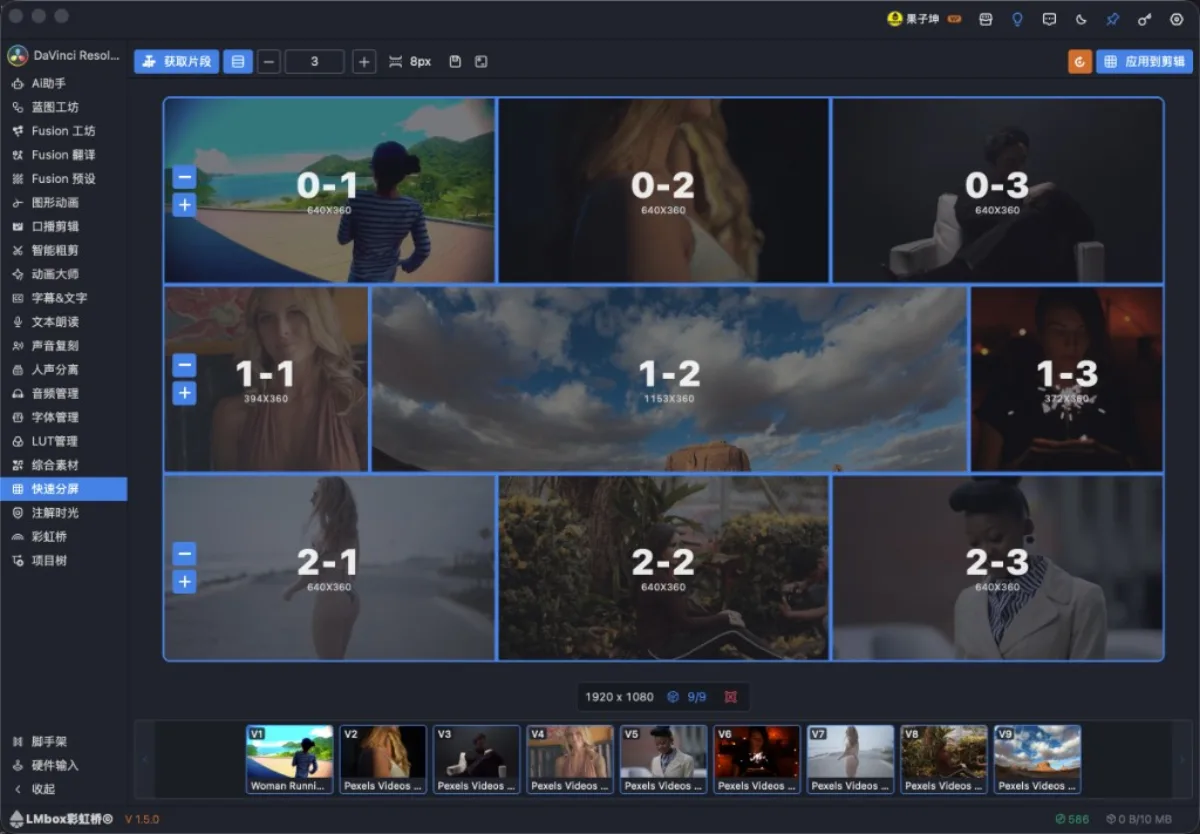
Figure: Split view on the desktop, with the 3×3 preview, dividers, the clip strip and "Apply to edit". The screenshot shows the Chinese interface.
Screen areas
| Area | What it does |
|---|---|
| left nav | Go to Split view and other feature pages |
| top bar Get info/clips | Reads the current timeline size. If there is a clip at the playhead, it brings back a still preview. An empty track also counts as success, so you can go on to import empty comps |
| top bar Main regions / direction | Add or remove main rows or columns, and flip the split direction |
| top bar Divider thickness | Sets the gap between panes (for example 8 px). It is scaled to the timeline when written |
| preview area in the middle | Drag a divider to resize; double-click to delete a line; each pane shows its bound picture |
| Pane right-click menu | On any pane: split in half, make square, equalize, set as cutout, delete. A pane with a clip can have it removed |
| Clip strip at the bottom | Thumbnails of fetched clips. Drag them to panes or assign them at random |
| Apply to edit | DaVinci Resolve / Premiere Pro: writes the crop. After Effects: uses track mattes for the panes and fills them with the shortest side of the original layer |
| Import empty comps | A top bar icon. Creates one empty comp of the same size for each pane and stacks them on the timeline. Works in DaVinci Resolve, Premiere Pro and After Effects. It does not change the crop of existing clips |
| top bar Save preset | Saves the current pane layout on your computer. Load or delete it from Custom in the right Properties panel |
| Properties panel on the right | Top tabs Layout / Properties / Animation (Animation comes later). Layout has built-in and custom presets. Properties shows size, binding and picture adjustments of the selected pane |
| Reset | Clears the crops on the timeline and the bindings, and keeps the current layout tree |
Steps
1. Prepare parallel tracks
To show clips on the same screen, they must sit on parallel tracks, not one after another on a single track.
2. Get info/clips
- Open the timeline or comp (an empty track is fine)
- Click Get info/clips
- If there are clips, they go into the bottom strip and fill the panes automatically. If there are none, the timeline size is still saved and you can go straight to Import empty comps
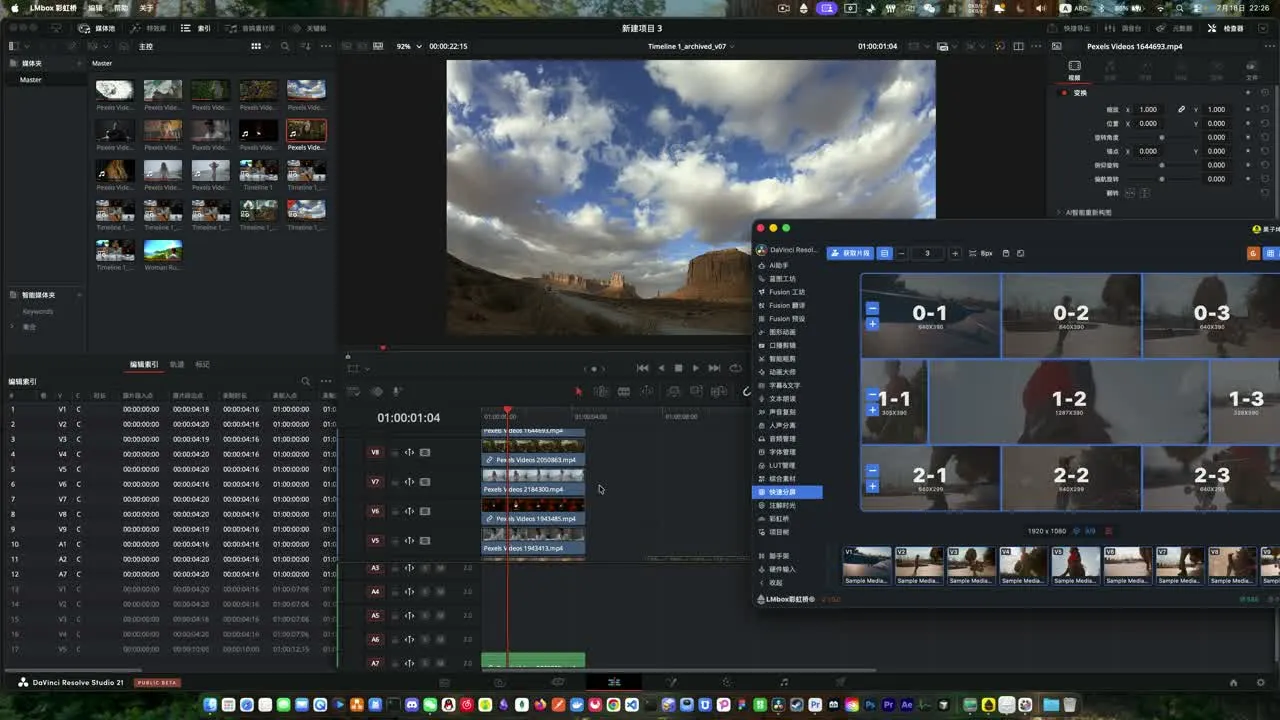
3. Design the panes and fill them
- +/− changes how many blocks there are along the main direction (rows or columns can be switched)
- Drag a divider to resize; double-click a divider to delete it
- Three ways to fill: auto-fill after you get the clips / drag from the bottom strip to a pane / Random assign (you can retry many times)
- Right-click any pane to change the layout (split in half, make square, equalize, set as cutout, delete). Select a pane with a clip to fine-tune the picture in Properties on the right
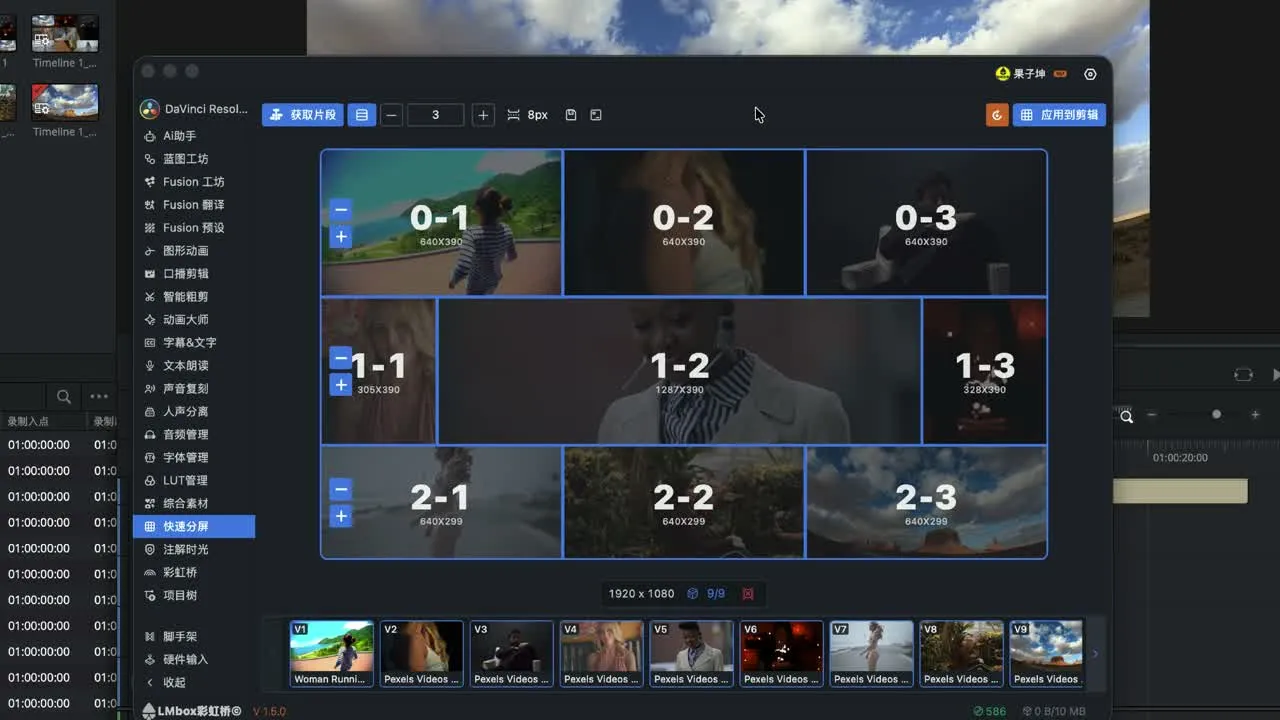
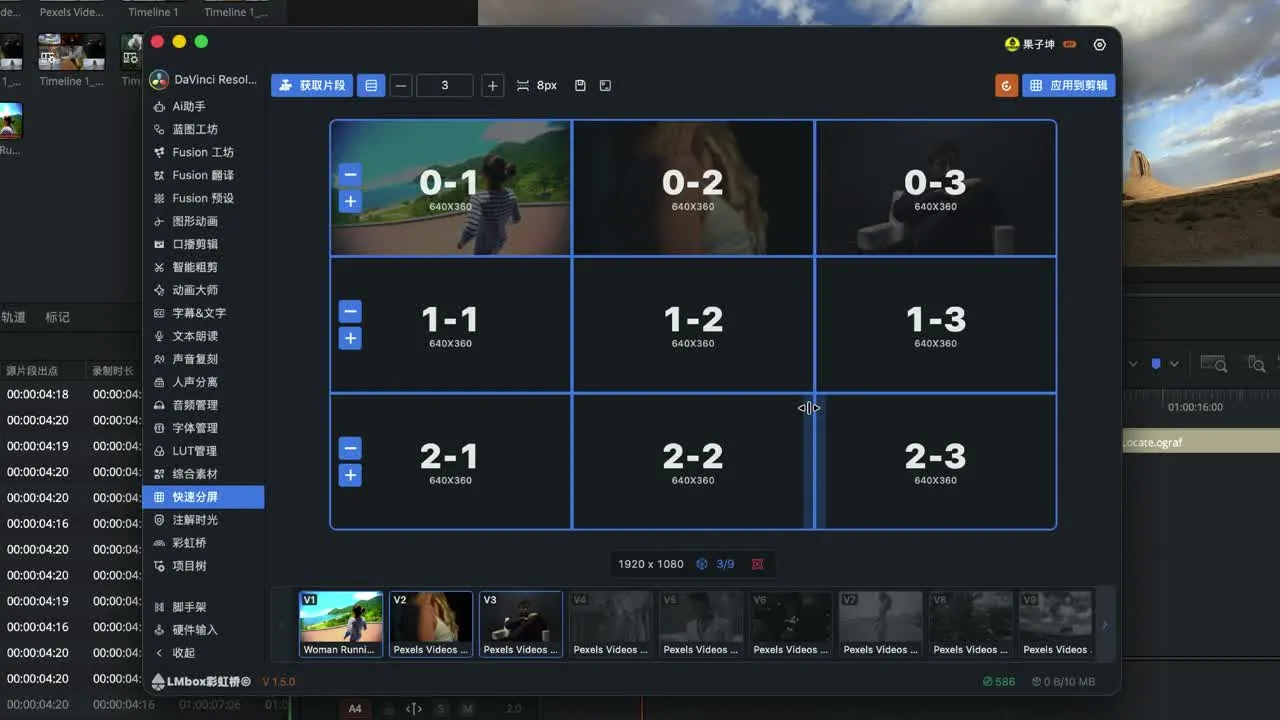
If there are fewer clips than panes: add or remove panes, unbind a pane, or drag clips in by hand.
Pane right-click: change layout and set a cutout
You can right-click any pane, including an empty one:
| Menu item | What it does |
|---|---|
| Split left and right / Split top and bottom | Both are in the menu, so you choose a horizontal or vertical cut. The original clip stays in the first block |
| Make square | Makes this pane square, by the timeline ratio |
| Equalize | Makes the panes in the same row (or column) equal |
| Set as cutout / Clear cutout | A cutout pane only holds the place and takes no clip. Drag and drop, random assign and "Apply to edit" all skip it |
| Delete this pane | Gives its share to the pane next to it. At least two main regions stay |
A cutout shows as a dashed empty spot in the preview. When you save a preset, it remembers which panes are cutouts.
Properties panel: fine-tune the picture
Select a pane that already has a clip. In Properties on the right you can fine-tune the picture (the preview follows at once):
| Control | What it does |
|---|---|
| Five-way pad on the left (up, down, left, right) | Pan the picture: about 10 pixels each time, to move the subject to a better place in the pane |
| Center of the five-way pad | Reset frame: clears this pane's zoom and pan and goes back to the default crop of the layout |
| Vertical buttons on the right / | Zoom in / out: about 1% each time. The scale shown in Properties treats 100% as the default crop |
Key points
- The preview follows at once. To really write into DaVinci Resolve / Premiere Pro, you still need to click Apply to edit in the top bar.
- If you bind another clip, unbind, or click Random assign, the fine-tuning of that pane (or the affected panes) goes back to zero.
- Save preset only remembers the pane layout and cutouts. It does not include each pane's fine-tuning. After you load a preset, select the pane again if you want to adjust.
4. Apply to edit
When the preview looks right, click Apply to edit. If you only moved dividers, click it again to refresh. To change the footage but keep the layout, click Reset and get the clips again.
After Effects: adds an Alpha track matte for each pane, fills the pane with the shortest side of the original layer and puts it at the center of the pane. You can still zoom and pan in the comp afterwards. Reset restores the zoom and position from before applying, and removes these matte layers.
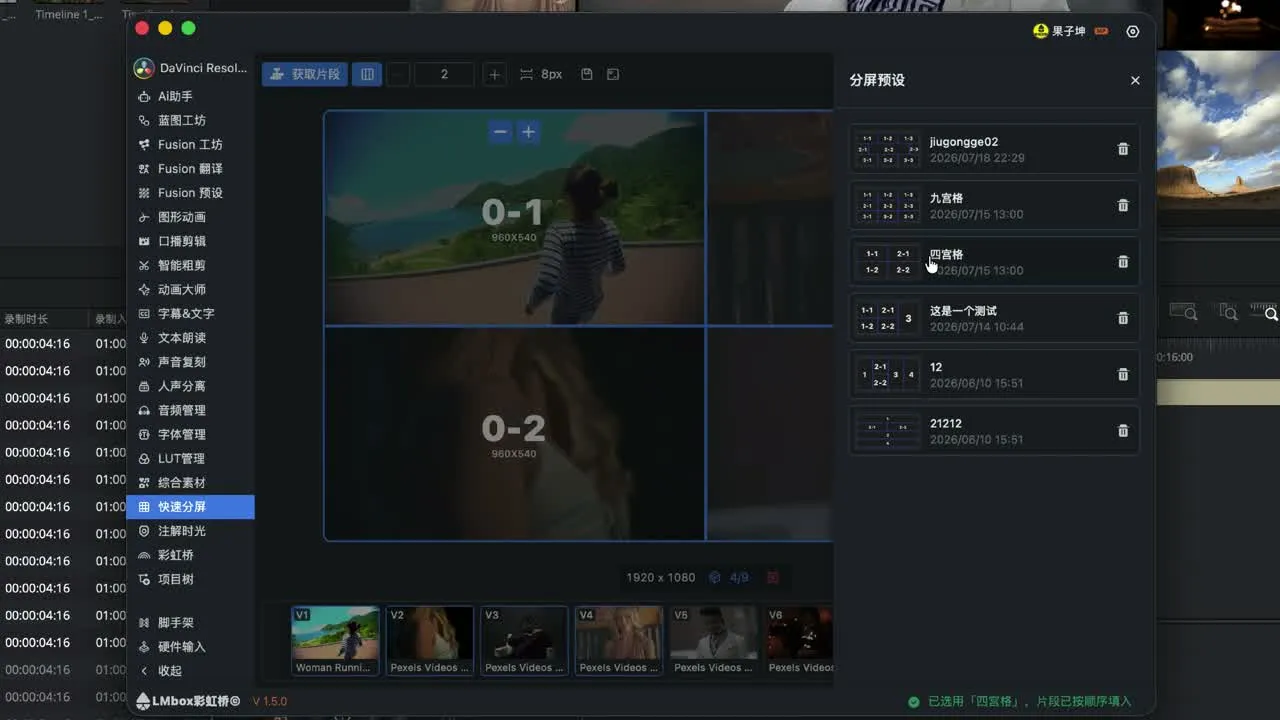
Split presets
Layout · Presets in the right Properties panel has a set of built-in layouts: 2-split to 4-split, 2×2 grid to 3×3 grid, left hero + two / top-left hero and so on, plus cutout layouts such as Title bar / Center cutout (Apply to edit skips cutout panes, so you can leave them for titles). Click one to apply it to the preview. The gap keeps the current top bar value. For a top-and-bottom version, flip the direction in the top bar instead of picking another duplicate preset.
Select a pane in the preview to open Properties on the right: pane size, bound clip, the cutout switch, and pan/zoom (five-way pad and zoom buttons).
For layouts you tuned yourself:
- Click Save preset in the top bar
- In the right Properties panel, choose Custom and click one to load it
- Click Get info/clips again to fill it with new footage
Preset layouts work across Premiere Pro and DaVinci Resolve.
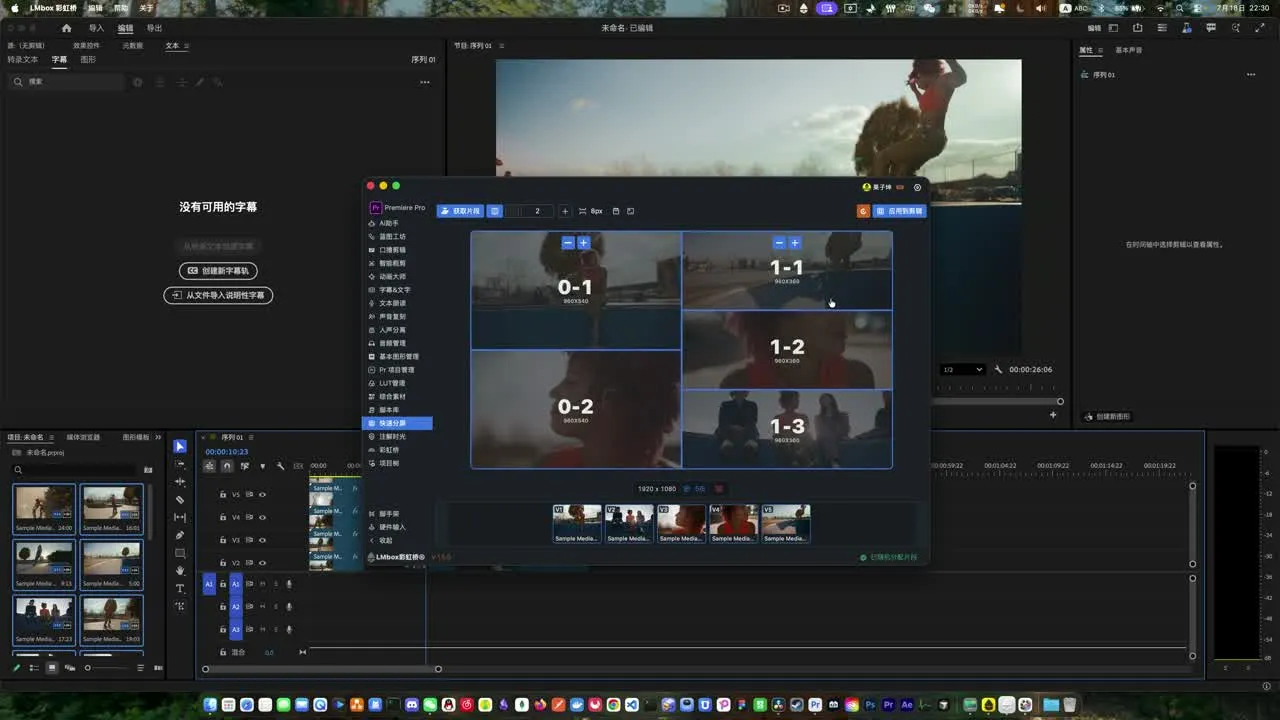
Premiere Pro 2×2 example
Load the 2×2 preset → select 4 parallel clips → get → Apply to edit.
How it differs from multicam editing
| Split view | Multicam editing | |
|---|---|---|
| Picture | Several clips at the same time in panes | Usually one angle at a time |
| Timeline | Clips are stacked in parallel | Usually sync first, then switch angles |
| Typical use | 3×3 grid, 2×2 grid, side-by-side compare | Interview direction, concert switching |
Wrong ratio or shifted crop
What you see: the preview lines up, but after applying the crop drifts or the dividers do not match.
Why: the write uses the editing app's crop, calculated from the footage's own ratio. If the footage ratio differs from the timeline, or it does not fill the timeline, it can shift.
DaVinci Resolve: scale to fill → New compound clip → get again and apply.
Premiere Pro: scale up to fill → Nest → get again and apply.
FAQ
Q: How is Split view different from multicam editing?
A: Split view puts several clips on one screen in panes. Multicam focuses on switching angles at one moment.
Q: Are DaVinci Resolve and Premiere Pro the same to use?
A: The screen and steps are the same. In Premiere Pro, select the clips before you get them.
Q: Can presets be shared between the two apps?
A: Yes. A preset stores the layout structure. After you switch apps, get the clips again.
Q: What if the ratio is wrong?
A: Scale to fill first, then make a compound clip (DaVinci Resolve) or nest (Premiere Pro), then get again and apply.
Q: I fine-tuned the picture but nothing changed on the timeline?
A: The preview follows first. It is only written when you click Apply to edit. If you change the clip or unbind, that pane's fine-tuning is cleared and you need to adjust again.
Q: Does a cutout get written into the edit?
A: No. A cutout only holds the layout. Drag and drop and random assign do not fill it either.
Q: Do presets keep each pane's zoom and pan?
A: No. A preset only keeps the layout structure and cutouts. After you load it, select the pane and fine-tune it in Properties.
Further reading
- Lab features overview
- Shot scout: find shots by description, another desktop efficiency tool
- Install the desktop app
- Demo video · Bilibili
Release notes
2.1.1Fixed creation failing at some unusual resolutions.2.1.1"Placeholder" in Properties is now called "Cutout".2.1.1Picture fine-tuning moved to the Properties panel on the right. The pane right-click menu now keeps only layout options.2.1.1After you select a pane you can see its size and binding in Properties and fine-tune the picture.2.1.1The Layout tab on the right has a set of built-in splits (grids, hero layouts, title cutouts). Click one to apply it.2.1.1"Import empty comps" in the top bar is now an icon button and shows its name on hover.2.1.1After Effects "Apply to edit" adds a track matte for each pane and fills the pane with the shortest side of the original layer, so you can still zoom in. It is separate from "Import empty comps".2.1.1Top bar "Import empty comps" creates one empty comp per pane and stacks them on the timeline, in DaVinci Resolve, Premiere Pro and After Effects. It is separate from "Apply to edit".2.1.1A pane can be set as a cutout: it only holds the place, takes no clip, and is skipped when applying to the edit.2.1.1Preset thumbnails now use dark backgrounds with gray blocks and no numbers; cutout panes use a darker gray.2.1.1The preview now uses tiles: each pane is its own rounded card and the gaps can be dragged. Apply to edit still writes by the cut-the-cake layout.2.1.1Fixed a crash when a DaVinci Resolve timeline had text titles. Text titles are now skipped; video, images and Fusion comps can still be split.2.0.0Getting preview stills from many DaVinci Resolve tracks is faster, so you wait less.1.9.3When DaVinci Resolve captures preview stills, the Color page no longer switches. On other pages it returns to the original page afterwards.1.9.1Pane right-click menu: zoom in/out, five-way pan, reset frame, unbind. The preview follows at once, and "Apply to edit" writes it all together.1.4.8Fixed wrong preview stills in Premiere Pro. Pane previews and clip thumbnails at the bottom now show correctly.1.4.0Fixed still capture failing and thumbnails not showing in Premiere Pro on Windows.1.3.2Added a preview of the split and drag-to-fill, so you can tune the layout and check the stills before applying to the edit.1.3.2Fixed clips not being fetched in some cases in DaVinci Resolve. The clip at the playhead can now be fetched normally.0.2.5The current layout can be saved as a preset with a cover preview, so you can recognize it in the preset library and load it in one click.0.1.9Fixed writing the crop through the Premiere Pro extension sometimes failing or showing an error. With the extension connected it now applies normally.0.1.9Fixed the crop applying to only one clip when several clips on a Premiere Pro timeline had the same name (for example after copying). It now works on every selected clip.