
Captions & text


"Captions & text" in LmBox handles the whole caption flow on the desktop: fetch, recognize, proofread and write back. You can read existing captions from the timeline, or recognize dialogue online or on your device, fix the text in a list, split or merge lines, then export or import into your editing app. The sidebar icon is .
Video tutorial
What you will learn
- Get captions from the timeline, import from a file, and recognize online or on your device
- Edit the list and use the common shortcuts
- Tasks and versions, find and replace, merge and split, script align, AI correction
- Create & export to the timeline / media pool / SRT / text
- Convert captions to templates: batch-convert to Essential Graphics (MOGRT) or Fusion titles
Guide
This is the main Lab guide for the LmBox desktop app. Screenshots on this page show the Chinese interface. You can switch the app to English in Settings. If you want to remove repeats, mark highlights or use AI on a word-level transcript, use Talking rough cut.
What it solves
| Pain point | What this page does |
|---|---|
| Captions already on the timeline need editing | Get from Timeline, edit in the list, then write back |
| You have sound but no captions | Online or On device recognition makes sentence-level captions |
| Recognized text is too choppy or too long | Merge and Split, and list shortcuts to split or join lines |
| You already have a final script and want captions from the audio | Script align: drop audio or take it from the timeline, then generate from the script |
| You want template styles | Convert to template: batch-write Premiere Essential Graphics (MOGRT) or DaVinci Resolve Fusion titles |
Before you start
- Pick the target editing app in the sidebar ( / / ). Its extension icon should be lit.
- Online recognition: sign in first, and follow the on-screen steps to set up an available recognition service.
- On-device recognition: in Settings, on the Large models page, download and apply the runtime and the caption model pack. Use an English path for the model folder.
- Before recognizing, make sure the timeline has audio that can be exported (or have a local audio/video file ready).
The desktop screen
Open from the sidebar. From top to bottom: top bar actions → (when recognizing) recognition panel and waveform → caption list.
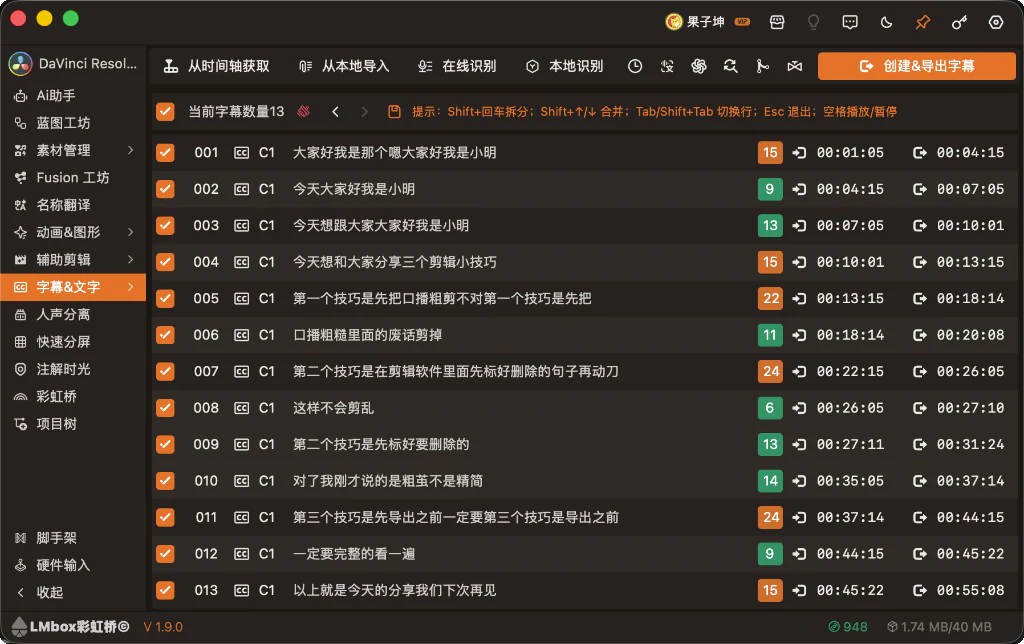
Figure: the top bar (get / import / recognize and "Create & Export Subtitles") and, below it, the caption list with editing hints. The screenshot shows the Chinese interface.
Screen areas
| Area | What it does |
|---|---|
| Get from Timeline | Reads captions / titles / graphics from the connected extension (choose the type) |
| Import from Local | Imports a caption file from your computer into the current list |
| Online | Opens the online speech recognition panel and takes audio from the timeline or the selected layers |
| On device | Recognizes on your computer. Take audio from the timeline, or drop audio/video to preview before you start |
| Tool icons | Task and Version History, Script align, AI Correction, Find and Replace, Merge and Split, Convert to template |
| Create & Export Subtitles | Import to the timeline / media pool, or export SRT or text |
| Caption list | Tick lines, edit text, see character counts and in/out points; use shortcuts to tidy up |
Recommended workflow
- Connect the extension and open this page.
- If you already have captions, click Get from Timeline or Import from Local. If not, use Online or On device.
- Edit text and split or join lines in the list. When needed, use Find and Replace, Merge and Split, Script align or AI Correction.
- Click Create & Export Subtitles and choose the timeline, the media pool, or a file.
- At important points, save a version in Task and Version History so you can go back.
Get and import
Get from Timeline
Choose how to get captions and the caption type (captions, titles, Essential Graphics, Fusion, source text and so on, depending on what the target extension supports), then start. The result goes into the current task list.
Import from Local
Pick a caption file on your computer. It becomes a new task or replaces what you are editing (follow the confirmation on screen).
Online and on-device recognition
Each mode opens its own panel and keeps its own options. Starting a new recognition usually clears the previous captions, so scripts do not mix. Click Start to take audio from the timeline, or drop audio/video into the dashed area first. The waveform below lets you listen to the prepared audio.
| Online | On device | |
|---|---|---|
| Audio source | Timeline audio; in After Effects, export by the selected layers | Timeline audio, or drop local audio/video to preview before you start |
| Audio range / tracks | Choose a range (such as the timeline in/out points) and audio tracks; you can click "Refresh" | Same |
| Common options | Digits, soften filler words, add punctuation, semantic sentence breaks, timestamp align, speakers, sensitive words, max characters per line, and more | Recognition model (such as Qwen), speakers, show punctuation, hot words, and more |
| Note | Needs sign-in and available caps | Set up the runtime and model pack first; your computer's performance affects speed and quality |
Online
Click Online in the top bar to open the panel. Set the range and options, then click Start.
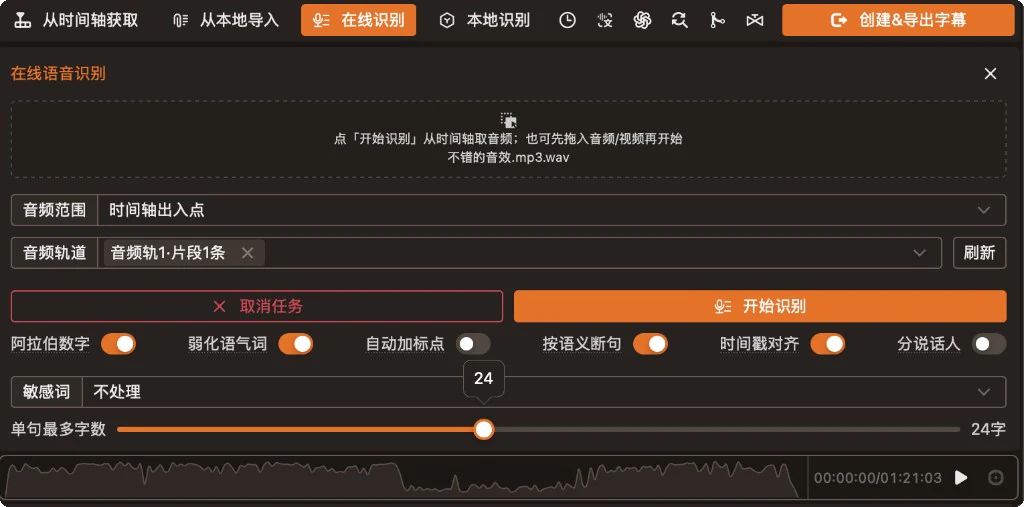
Figure: online recognition with the drop area, audio range and tracks, option switches and waveform preview. The screenshot shows the Chinese interface.
On device
Click On device in the top bar to open the panel. Before recognizing, apply the runtime and the caption model in Settings. The hot words box takes names, brands and other proper nouns.
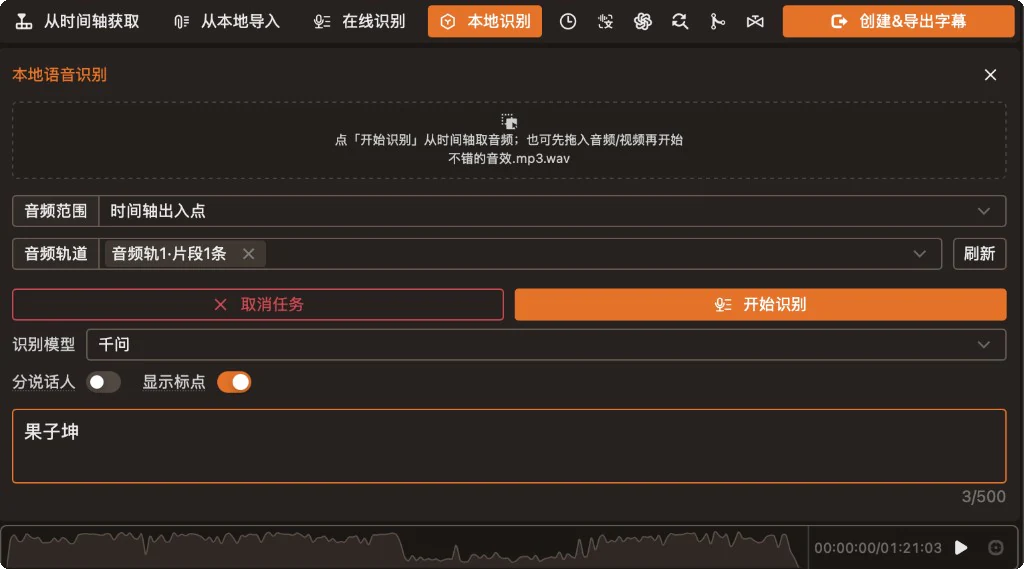
Figure: on-device recognition with model choice, speakers / show punctuation, hot words and waveform preview. The screenshot shows the Chinese interface.
While recognizing, the list can highlight along with playback. Next to the waveform you can use Scroll to current subtitle to bring the playing line into view.
Caption list and shortcuts
The list shows the number, track, text, character-count hint and in/out points. When it is empty, follow the top bar hint to get, import or recognize.
Common shortcuts while editing (also shown at the top of the screen):
| Shortcut | What it does |
|---|---|
Shift + Enter | Split caption |
Shift + ↑ / ↓ | Merge captions |
Tab / Shift + Tab | Move between lines |
Esc | Leave editing |
Space | Play / pause the recognition audio |
Tick several lines to use the tools in bulk. Clearing the list asks you to confirm first; after that you need to get or import again.
Tool drawers (top bar icons)
The row of icons in the middle of the top bar opens a drawer on the right. Task and version history comes first, then the others in the table.
Task list and version history
Click to open the drawer on the right. It has two tabs:
| Tab | What it does |
|---|---|
| Tasks | Past recognition / import tasks, with status, line count, version count, the Online / On device tag and "Done" |
| Versions | Saved versions of the current task. You can switch back to a version, and the edit area supports undo / redo |
Click a task to switch the current caption draft. You can pin or delete a card. At important points, save a version before you start a new recognition or rewrite a lot, so nothing is lost when the list is cleared.
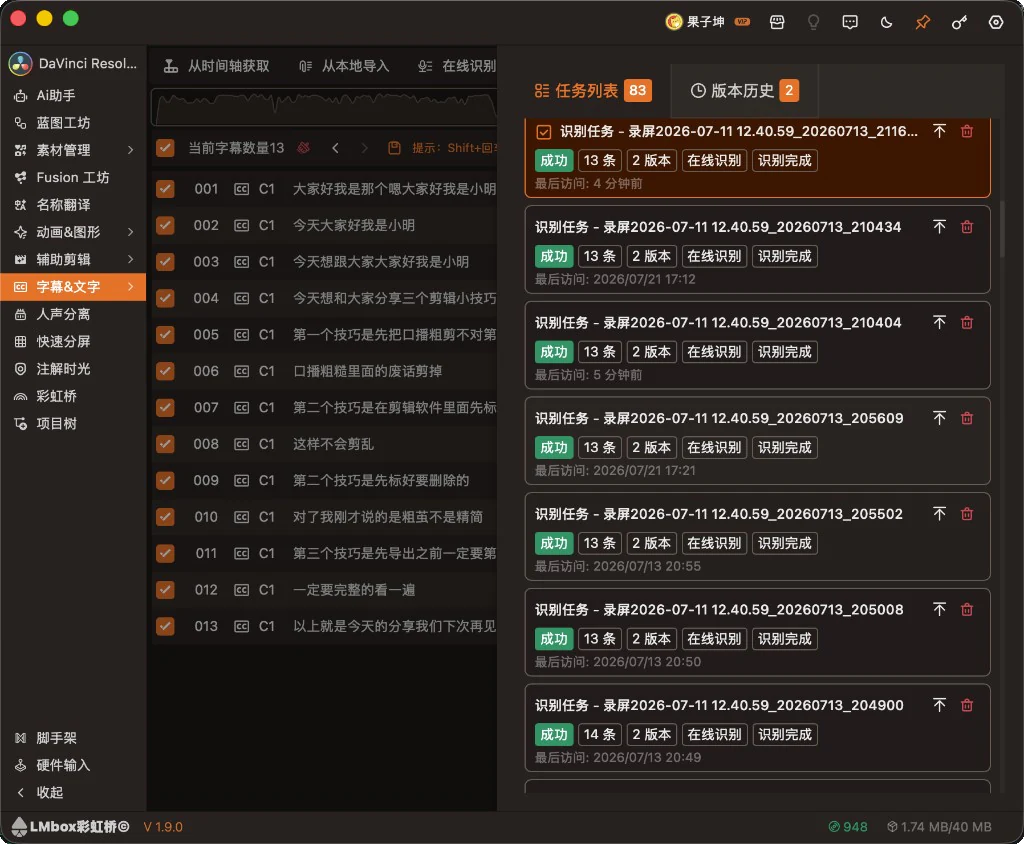
Figure: the "Tasks" tab in the right drawer, with recognition task cards, line and version counts and the Online tag. The screenshot shows the Chinese interface.
Script align
Click Generate subtitles in the top bar and choose Script align. Drop audio/video, or export audio from the timeline, then paste your final script one sentence per line (a new line makes a new caption). Format script breaks lines at periods, question marks and commas, and Remove punctuation strips the punctuation at the end of each line. Then click Generate from script. You do not need to run recognition first. If a pack is missing, the app jumps to the Large models page in Settings. The result is a new task, with caption blocks fitted to the speech and starting slightly early to cover the first sound.
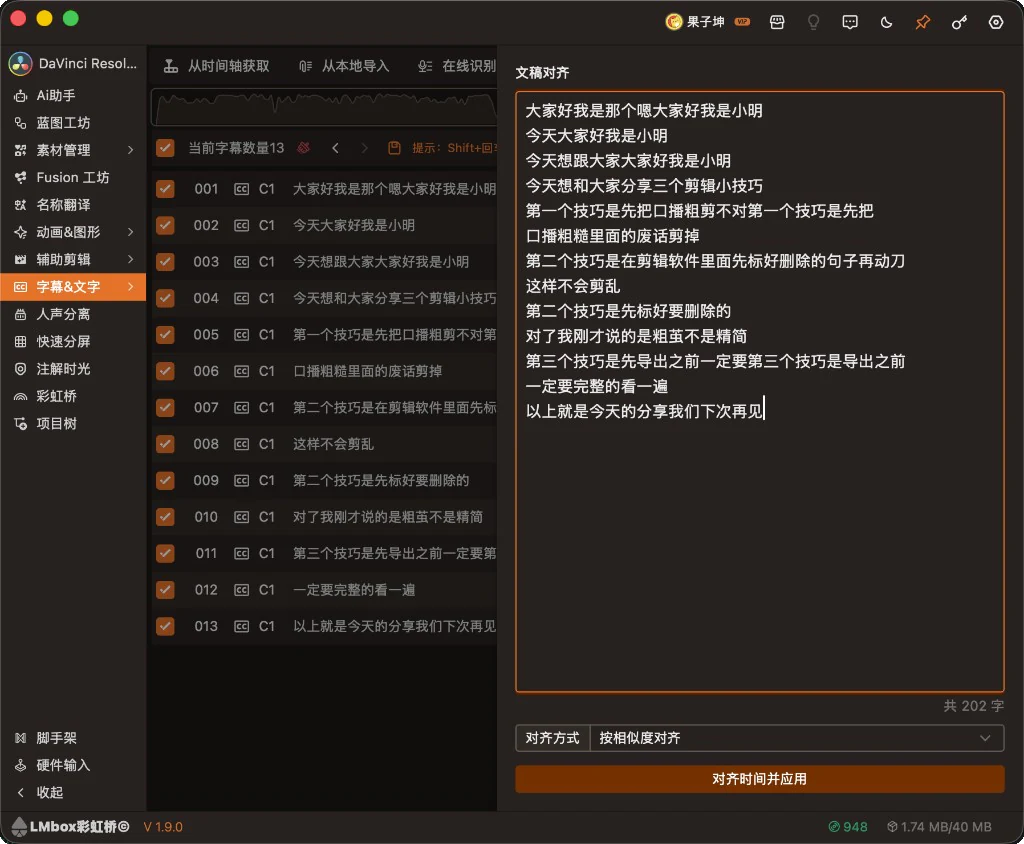
Figure: "Script align" inside Generate subtitles, with the audio and the final script, and Generate from script. The screenshot shows the Chinese interface.
AI correction
Click to open the drawer on the right. You can choose a route such as Official cloud / Golden key / Keychain / your own model (follow what the screen shows), tick the jobs to run, then click Submit repair job. Long videos may be written into the list in several rounds.
| Job (pick several) | What it does |
|---|---|
| Reference | Paste the original script or proper nouns to help check the text |
| Fix typos | Fixes wrong words and awkward lines |
| Split and merge lines | Splits long lines to read better and merges very short ones |
| Remove fillers | Removes um, ah and similar filler words |
| Fine-tune timing | Reduces overlaps and follows the speaking rhythm |
| Translate | Translates the caption text |
| Unify names and spelling | Makes names, brands and similar terms consistent |
An optional "Include word-level text" uses more caps and is off by default. When split and merge is ticked, caption lines are really added or removed.
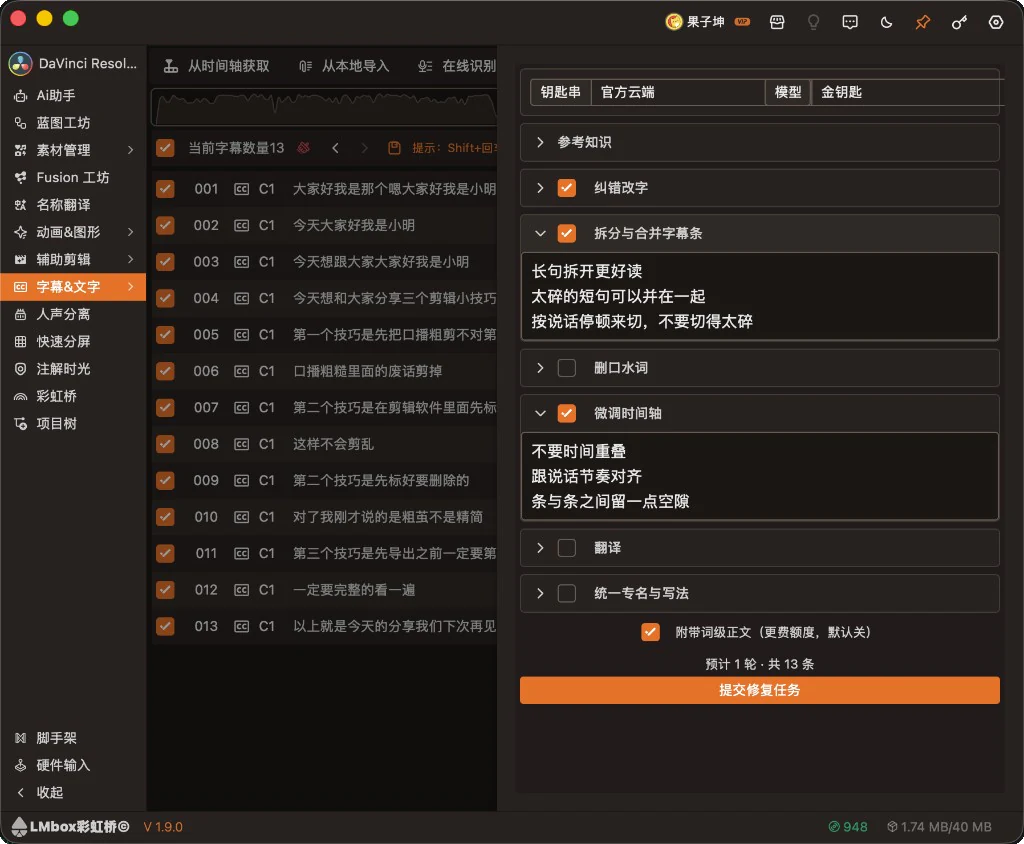
Figure: AI correction with the Official cloud route, the job checkboxes and "Submit repair job". The screenshot shows the Chinese interface.
Find and replace
Click to open the drawer on the right. Matches in the list are colored to tell the original from the replacement.
| Section | What it does |
|---|---|
| Block Words Settings | Modal particles, punctuation, sensitive words, and custom sensitive words (press Enter to add) |
| Replace Settings | A list of "Replace A with B" rules; add or delete rules |
You can also detect blocked words from the timeline audio and insert or overwrite censor beeps in one click, without changing the caption text. Rules apply on import / export and when saving.
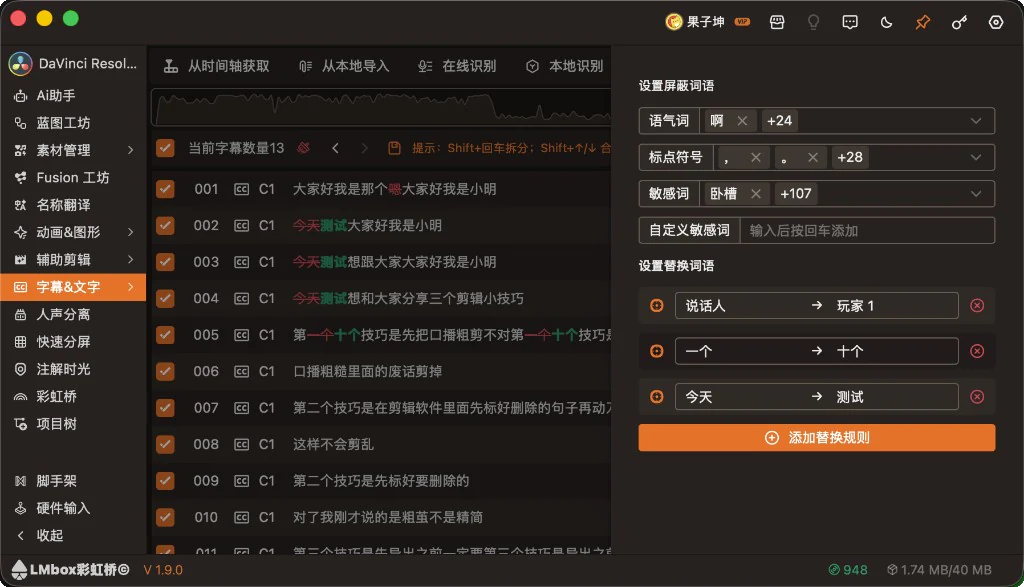
Figure: find and replace with block word tags, replace rules, and the red / green highlight in the list. The screenshot shows the Chinese interface.
Merge and split
Click to open the drawer on the right. Merge and Split have separate switches. We suggest clicking Preview to see how the line count changes, then Apply to current subtitles (this is saved as a new version).
| Section | Common options |
|---|---|
| Merge | Merge overlapping lines, short neighbors, and lines that do not end a sentence; same track only; how to join text (space / new line / no separator); max duration, characters and gap for short lines |
| Split | Split at punctuation (period, exclamation and so on); split very long lines evenly as a fallback; split reference duration and characters |
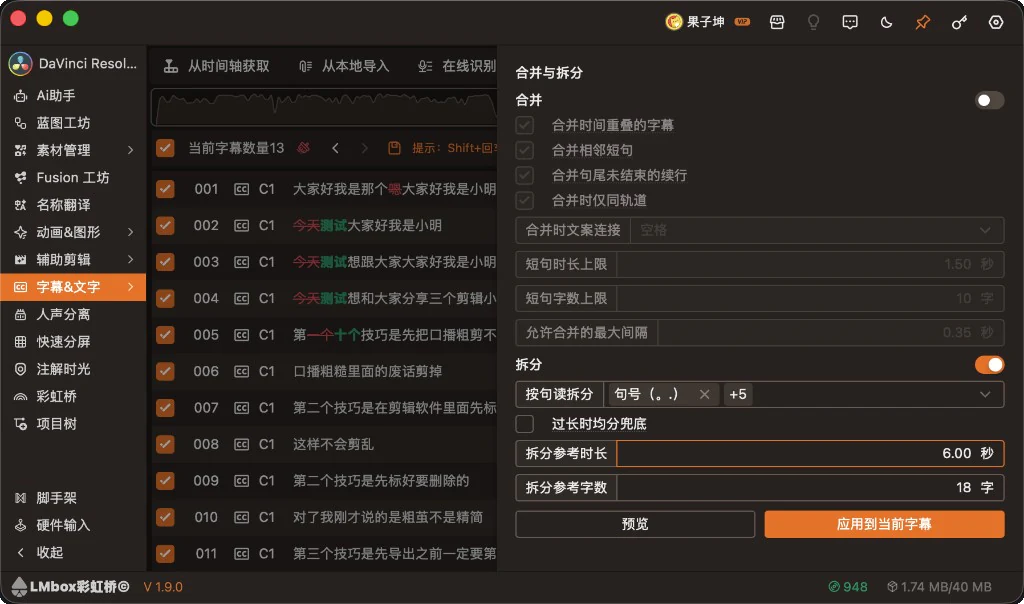
Figure: merge and split with the merge options, split at punctuation, and Preview / Apply to current subtitles. The screenshot shows the Chinese interface.
Convert to template
Click to open the drawer on the right. It batch-writes the captions in the list into styled template clips:
| Target app | How to use it |
|---|---|
| DaVinci Resolve | Drag your finished Fusion style into the media pool → click Load Fusion media-pool templates → choose the template and track → Convert |
| Premiere Pro | Select an Essential Graphics (MOGRT) clip with text on the timeline → Load template from selection → choose the text control → Convert (the matching extension must be connected; what it can do depends on the version) |
You can also set the time reference for creation (such as the playhead), the target track, and the caption type / source filters. The screen shows "N line(s) will convert", and you can Stop while it runs.
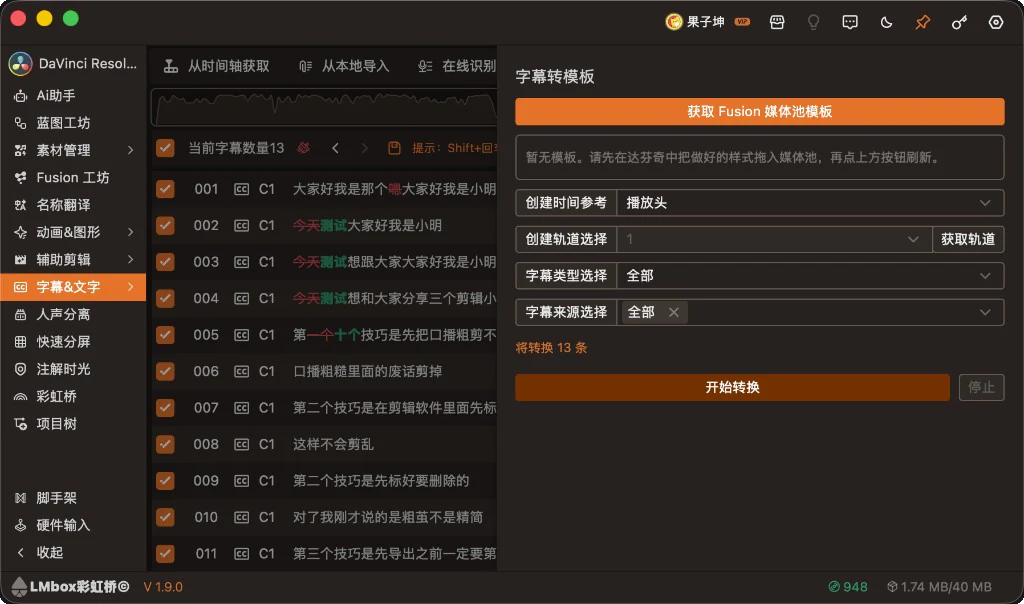
Figure: convert to template with Load Fusion media-pool templates, time reference, track and Convert (DaVinci Resolve side shown). The screenshot shows the Chinese interface.
Create & Export Subtitles
Click Create & Export Subtitles at the right of the top bar to open the dialog. Choose the Create Type, then Time Alignment (when writing to the timeline), and finally click Start Create/Export.
| Create Type | Description |
|---|---|
| Import to Timeline | Writes to the timeline of the connected editing app |
| Import to Media Pool | Writes to the media pool (DaVinci Resolve and similar) |
| Export SRT | Exports a caption file to your computer |
| Export Text | Exports plain text |
| Time Alignment | Description |
|---|---|
| Original Time | Places captions by their own in/out points |
| Timeline Start | Aligns to the start of the timeline |
| Current Playhead | Aligns to the playhead |
| Clip Start | Aligns to the start of the clip |
You cannot create when the list is empty. Get or recognize captions first.
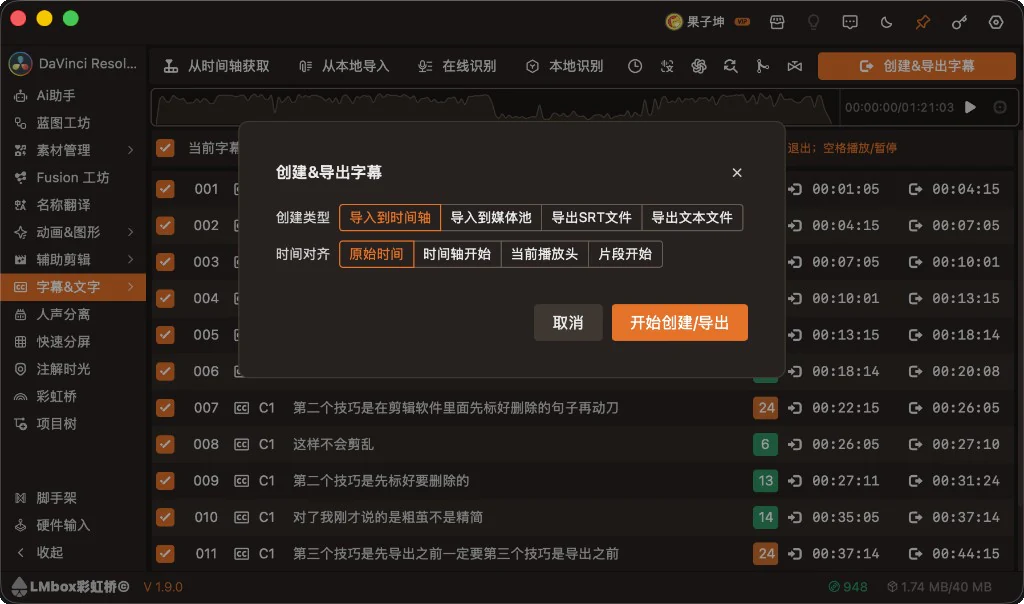
Figure: Create & Export Subtitles with the create type and time alignment, then Start Create/Export. The screenshot shows the Chinese interface.
FAQ
On-device recognition says the model is not set up?
Go to the Large models page in Settings, download or upgrade the runtime, apply the caption model pack, then try again.
The result is mixed with the previous round?
A new recognition clears the previous one. If you want to keep it, save a version in Task and Version History first.
Blocked words / replacements do not apply after import?
Check that the rules are set in Find and Replace. A newer version fixed export still writing the original text, so keep LmBox up to date.
I only want a word-level rough cut of talking video?
This page is a sentence-level caption workflow. For word-level cuts and highlights, use Talking rough cut.
Release notes
2.9.0With older Premiere Pro versions that cannot put imported captions on the track, the app now opens the project caption folder so you can drag them onto the timeline by hand.2.8.0Script align formatting now also breaks lines at commas, and you can remove the punctuation at the end of each line in one click.2.8.0Fixed taking audio from the timeline still using the old file after you changed in/out points or tracks, and side tracks leaking in. It now exports again by the chosen range and tracks.2.7.0Script align now generates straight from your final script after you drop audio or take it from the timeline. Caption blocks fit the speech and start slightly early to cover the first sound. No need to recognize first.2.1.1Fixed a problem where audio could not be taken from a track after a transition was added in DaVinci Resolve. Recognition now works.2.0.0Fixed on-device recognition failing to prepare audio when a DaVinci Resolve timeline used proxy media. It now works.1.6.0List editing supports Tab / Shift+Tab to move between lines, Esc to leave editing, and Space to play / pause the recognition audio. Next to the recognition waveform you can click "Scroll to current subtitle" to bring the line into view.1.6.0Caption AI correction can use "Official cloud / Golden key", so you do not need your own model key.1.6.0Fixed the list jumping back to the top or jittering when merging or splitting with shortcuts. The editing position now stays steady.1.6.0Caption AI correction options now use clearer job names (fix typos, split and merge lines, remove fillers and more). With split and merge ticked, lines are really added or removed, and long videos are repaired in rounds, written into the list round by round.0.3.0Online and on-device recognition can choose the audio range and track. DaVinci Resolve audio follows the timeline in/out points, and opening the panel refreshes the track list.0.2.9Improved the stability of on-device recognition. Once the runtime and model are ready, recognition runs more smoothly.0.2.8Fixed a false "Set up the on-device model in Settings first" message with the installed app. Recognition works once setup is ready.0.2.8Fixed recognition failing when the runtime from the offline pack was old. Download the runtime again on the Large models page in Settings, or apply the pack again.0.2.8Fixed on-device recognition saying the model was not set up or could not start on Windows when the model path had Chinese characters.0.2.6Fixed "could not prepare" when running on-device recognition from the editing timeline. Captions are now recognized normally.0.2.5In Find and Replace you can detect blocked words from timeline audio and insert or overwrite censor beeps in one click, without changing the captions.0.2.4Added "Script align": paste a final script (one sentence per line) and align the time of each sentence.0.2.4Fixed speaker labels still showing after turning off "Speakers" in online recognition.0.2.3You can choose an on-device model for recognition and get sentence-level and word-level captions on your computer.0.2.3Reworked the online and on-device recognition flow: options are saved separately, and starting a new recognition clears the previous captions so they do not mix.0.2.3On-device recognition lets you drop audio/video to preview the waveform and start by hand. The list and the waveform progress highlight together while recognizing.0.2.3On-device recognition can separate speakers and splits caption lines by punctuation first. The list hides punctuation by default (sentences are still split by punctuation).0.2.3Better task history and version management: browse many recognition tasks, save and switch versions, and undo / redo in the edit area.0.2.3Better "Merge and Split": merge and split have separate switches, with split at punctuation and merging of continued lines to tidy recognized text.0.2.3The Premiere Pro LmBox extension now works with this page for speech-to-caption and reading captions from the timeline.0.2.3Task list and version history are clearer, and the list and current content are less likely to disagree when you switch tasks.0.2.3Fixed blocked words or global replacements not applying when importing to the editing app, exporting or saving; the original text was still written.0.2.3Fixed the list not highlighting with progress when playing the recognition preview, and list checkboxes only sliding but not ticking on a click.0.2.2With After Effects connected, "Online" can export audio from the selected layers and generate captions.