
Voice replicate


"Voice replicate" in LmBox clones a usable voice from a short reference recording, then lets you type a script and synthesize a voice-over. You can use the official route (billed by account and caps) or local model cloning (preview), where the reference audio stays on this computer. After synthesis you can preview, Import to timeline or Export audio. The sidebar icon is . If you only need a general voice and no cloning, use Text reading.
Video tutorial
What you will learn
- Choose the synthesis route: official / local model clone
- Create or pick a saved voice
- Enter a script, adjust speed or reading style, then synthesize
- Official route: get subtitles from the timeline or import them from this computer, voice them sentence by sentence and place them aligned on the track
- Import to the editing timeline or export audio
Guide
This is the Lab guide (main document) for the LmBox desktop app. Local cloning requires downloading the voice models in Settings first. For installation see LmBox desktop install; to connect the extension see Plug-in manager.
What it solves
| Pain point | What this page does |
|---|---|
| You need a specific voice for narration | Record / pick a reference → create a voice → synthesize |
| You don't want to upload the reference audio | Choose Local model clone (preview); the reference stays on this computer |
| The result must go on the timeline | Import to timeline, or export / drag out the audio file |
| Voice-over must line up with existing subtitles | On the official route click Get from timeline or Import subtitles from local, synthesize per sentence, then import |
Before you start
- Pick the target editing app in the sidebar ( / / / Final Cut and so on), and make sure the extension icon is lit (when you want to import).
- Official route: sign in first and have enough caps as prompted.
- Local model clone: download and apply the needed voice models in Settings; a clear reference recording works best, with more than about 3 seconds of actual speech (only the first ~20 seconds are used at most).
- Before importing to the timeline, choose a cache folder in Settings.
Desktop screen
Open from the sidebar. From top to bottom: top bar (subtitle entry) → text or subtitle list → waveform and preview (free text) → synthesis route / Create voice → saved voices and parameters → Synthesize / Import / Export.
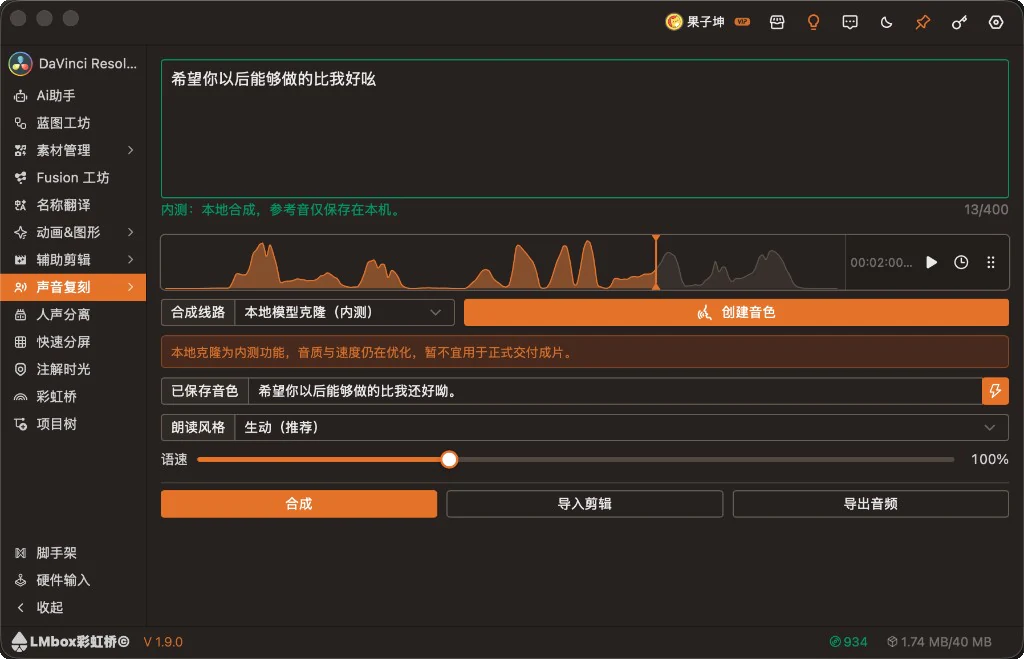
Figure: the local model clone route: text, waveform, create voice, saved voices and reading style, Synthesize / Import / Export. The screenshot shows the Chinese interface.
Screen areas
| Area | What it does |
|---|---|
| Top bar | Get from timeline / Import subtitles from local; once loaded it shows the line count, character count and estimated caps, and you can clear the subtitle script |
| Text box | Free text: enter the text to synthesize; shows the character count and billing / preview hint |
| Subtitle list | Subtitle script: one sentence per row, editable; you can pause, resume or cancel while voicing |
| Waveform preview | Preview after free-text synthesis; the reading history is in the top bar |
| Synthesis route | Official route or Local model clone |
| Create voice | Upload / record a reference and register it as a usable voice |
| Saved voices | Pick an existing replicated voice on this computer or under your account |
| Parameter area | Official: speed, pitch, volume, sample rate and so on; local: reading style, speed and so on |
| Synthesize / Import to timeline / Export audio | Generate, write to the timeline, save to this computer |
Which route to choose
| Route | Description |
|---|---|
| Official route | Cloud replication and synthesis; billed by account and caps; you can create and manage registered voices |
| Local model clone | Preview: synthesizes on this computer and the reference is not uploaded; models must be configured; the screen warns that quality and speed are still being improved, so it is not yet suitable for final delivery |
Recommended workflow
Local model clone (preview)
- Set Synthesis route to Local model clone.
- Click Create voice: choose or record the reference audio, fill in the reference text (what is said in the reference), and save it on this computer.
- Select that voice under Saved voices; set the Reading style (such as Expressive / Natural / Steady) and Speed as needed.
- Type the script and click Synthesize.
- After listening, Import to timeline or Export audio.
Official route
- Set Synthesis route to Official route and sign in.
- Click Create voice: upload or record the reference as prompted and submit the replicate (the reference generally has to be longer than about 3 seconds).
- Pick it from the voice list; adjust speed, volume and so on (a speaking-style instruction and other options are optional).
- Enter the script: select text to add a pause or change how it is read; pronunciation changes and word swaps from "More options" are marked on the matching characters.
- Synthesize → import or export.
Voice-over by subtitles (official route)
- Set Synthesis route to Official route and choose a voice.
- In the top bar click Get from timeline (the editing extension must be connected and the timeline must already have subtitles), or Import subtitles from local.
- Check each sentence in the list, then click Synthesize; the top bar shows the line count, character count and estimated caps, and you can pause, resume or cancel while voicing.
- When done, Import to timeline: each sentence lands at its subtitle's start; short readings leave a gap, and overlapping sentences move to another empty track.
Local model clone does not support subtitle scripts yet; switch back to the official route first.
After a successful synthesis the result goes into the reading history; you can also drag the file out from beside the result.
Tips for creating a voice
- Use a quiet environment and continuous speech for the reference; clips that are too short or nearly silent are rejected.
- Local: the reference text must match the reference audio; give the voice a name to manage it more easily.
- Official: after submitting you can pick it from the voice list; removing it syncs to the cloud (follow the on-screen confirmation).
FAQ
Local synthesis says no model is configured?
Download / apply the voice models in Settings, then try again.
The official route says to sign in / not enough caps?
Sign in to your account; if you are short of caps, top up in the app.
Import to timeline failed?
Finish a synthesis first; make sure the extension is connected and a cache folder is set.
Only need a general voice?
Use Text reading; no need to replicate.
Release notes
2.4.2On the official route, subtitles can be taken from the timeline or imported from this computer, voiced sentence by sentence and placed aligned on the track; the top bar shows the line count, character count and estimated caps, the list has one sentence per row, and voicing can be paused, resumed or canceled.2.4.1On the official route you can add pauses, change pronunciations or swap words directly in the script, and synthesis reads the marks.1.9.3The synthesized waveform now stops when it finishes by default; a loop toggle is available beside play.1.1.0Added local voice replication (experimental).0.3.0Fixed the synthesized waveform preview area being stretched too tall on the Voice replicate page on Windows.0.1.9Fixed an issue when importing audio to the timeline: if another Lab had been opened before, the first import could wrongly warn that it did not match the Lab on the left; you can now import directly.0.1.9Fixed an issue when connected to DaVinci Resolve: after importing replicated audio several times, later imports other than the first did not land on the track; you can now import repeatedly.0.1.8Added a drag-out action beside the synthesized result, so you can drag the finished audio into a folder or another app.