
On-screen keys

When On-screen keys is on, it overlays a display on the screen: the shortcut you press is joined with +, and each new layer stacks on top of the older one. It is good for recording tutorials or streaming so viewers can see what you pressed. The overlay does not block clicks.
What you will learn
- Click the slot on the floating toolbar to turn the display on / off
- Choose to pin it to a cell of the screen, or follow the mouse
- Choose whether the overlay captures keyboard or mouse, and adjust size, opacity, max stack, timeout and layer gap
Where to find it
- Open in the sidebar
- Drag On-screen keys into an empty slot
- Click the slot on the floating toolbar: turn the display on or off
- Click the slot in the main window: change the look and what is captured, at the bottom right
Turning the display on can only be done by clicking the slot on the floating toolbar. Clicking the slot in the main window only opens the settings at the bottom right and does not switch the overlay.
Works on Mac / Windows.
Mac
The system Accessibility permission is required to read key presses. The footer warns you if it is not granted.
Settings at the bottom right
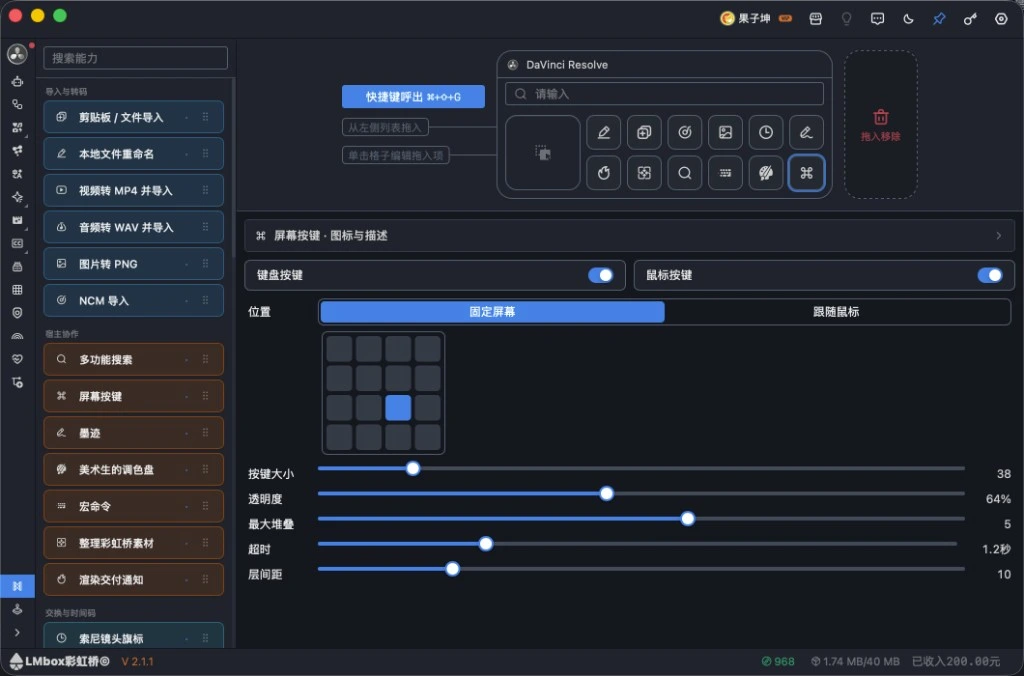
Figure: click the slot in the main window: keyboard keys / mouse buttons (both on by default), pin to screen or follow cursor, size and stacking. The screenshot shows the Chinese interface.
| Item | Description |
|---|---|
| Keyboard keys | Whether the overlay captures the keyboard. On by default |
| Mouse buttons | Whether the overlay captures left / right / middle clicks (for example ⌘+left click). On by default |
| Position | Pin to screen: lands in the cell you choose in the 4×4 grid (default lower center); Follow cursor: the newest layer sits at pointer height and older layers stack upward |
| Key size | Font size and key block size |
| Opacity | How transparent the overlay is |
| Max stack | How many layers are kept at once; older ones are dropped beyond that |
| Timeout | How long a layer stays before it disappears (seconds) |
| Layer gap | The space between two layers |
These two switches only decide what the overlay shows; they cannot replace clicking the slot on the floating toolbar to turn the whole display on or off.
Repeating the same key combination merges into ×N, so it does not use many layers.
Changes apply right away to the overlay that is showing.
Use it on the floating toolbar
Click the slot to switch it on or off. A lit border means the overlay is on. You do not need to drop files first.
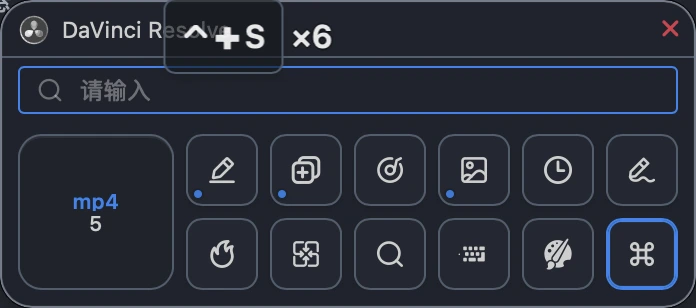
Figure: the overlay shows ⌃+S; pressing the same combination repeatedly merges into ×N. The screenshot shows the Chinese interface.
Works with
All Toolkit hosts. It shows system key presses and is not tied to any one editing app.
Not supported for now
It does not draw mouse trails, does not show input-method composition, and does not save or upload key contents.
FAQ
Q: Nothing shows on screen after turning it on?
A: Light the slot on the floating toolbar first, then press a few shortcuts. Also make sure at least one of "Keyboard keys" or "Mouse buttons" is on. On Mac, check the Accessibility permission.
Q: The overlay blocks clicks?
A: It should not. If something is off, turn it off and on again, or restart LmBox.
Q: Want it to follow the pointer?
A: Set the position to Follow cursor. To stop it moving, switch back to Pin to screen and pick a grid cell.